The point where the clicker goes off should NOT be at your absolute end range. You should be able to expand ~5mm past the clicker without moving the rest of your technique. You can see this demonstrated in the Clicker Extension Drill shown in the video below. The archer can expand nicely past the clicker. If you can’t expand at all past the clicker, this could be a sign you’re overdrawn and have your clicker too far back on your bow.
You might feel like you get to full draw, the structure of your shot is good and you’re ready to shoot but there’s just no room to expand. This could mean you’re overdrawn, but a word of caution.
Sometimes this is caused by using the draw shoulder incorrectly and engaging the upper traps and muscles around the neck. You should visually check your shoulder blade position and movement through the shot by taking a video of your shoulder blades. Normally it’s best to take this video without a t-shirt on so you can properly see your shoulder movement. You can read more about the muscles of the back and what the draw should look like in our technique section: Drawing – The Back Muscles.
If you’re overdrawn your body will still find a way to expand through the clicker. This can often result in you losing your posture and arching your back in an attempt to get through the clicker. When you work on your technique, this is why it’s important to work from the ground up. You should make sure your posture is good as a priority.
If you sometimes come through the clicker very early, this could be a sign you’re underdrawn. A great way to test this is to draw the bow at close range blank bale with your eyes shut. Put an arrow in the bow and do everything as normal, just don’t shoot the arrow. If you consistently click early with your eyes shut it could indicate you’re underdrawing.
When you do this you should make sure to replicate the 70m angle you normally shoot at though.
If you’re underdrawn you won’t get the proper feeling of being inside the bow at your real full draw position. This is because you won’t have properly aligned all the bone structure in your body to minimise the amount of effort you need to hold the bow. You can read more about this specific part of the technique in here: Reaching Real Full Draw.
We now know that if you don’t feel as if you’re inside the bow, you’re probably underdrawn. We also know that to get the feeling of being inside the bow, and to get to ‘real full draw’, you need good shoulder alignment.
This means if you don’t have good shoulder alignment, your draw length is probably too short. This is why it’s possible for a shorter archer to have a much longer draw length than a tall archer – it all comes down to alignment.
If your draw length is too short or too long, the forces of your expansion will not be properly aligned.
When you expand, you should feel as if the draw elbow is going to fly backwards and the bow hand is going to aggressively push into the gold. If your draw length isn’t correct, your execution will probably feel soft and not aggressively directed.
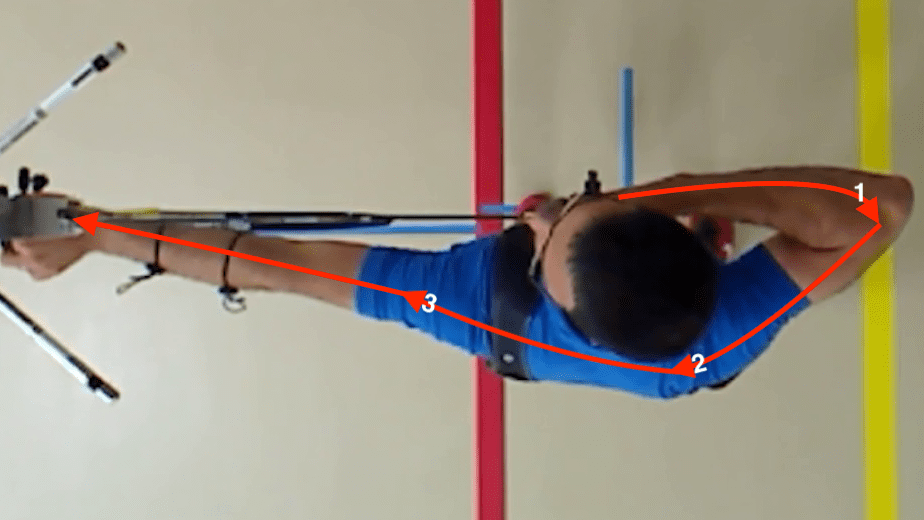
The image below shows the process for your expansion which you can read more about on our expansion page. As you can see, the draw shoulder movement leads into the bow hand being directed towards the target. If your alignment is not good it will be extremely hard to correctly align these forces.
There are basic steps to making sure you’re shooting with the right draw length for you. As always, this starts with your technique and ability to pull the bow back.
If you think your draw length is wrong, you should first identify what part of your recurve technique is causing an issue. Obviously there are many interrelated factors, but try and identify the main cause.
For example, it could be that your posture is the main reason you’re overdrawing your bow. It could be that you don’t properly achieve your shoulder alignment because your setup position is not consistent enough. Find out the specific technique area and identify how can work on this.
We’ve got technique guides for each stage of the shot that you can use at your own pace to learn more about your form. If you haven’t already read it, I’d recommend you start by reviewing our Recurve Shot Cycle guide. From there, you can see how the whole shot works together and find links to all our technique sections too.