Your draw technique is one of the most important parts of your shot cycle in recurve archery, and it’s how you get from your setup position to full draw. It is crucial to do this correctly to achieve your optimum shoulder positioning at full draw.
If you draw properly, you should be able to reach your real full draw position consistently and use your shoulders to expand smoothly through the clicker. The aim here is to bring the draw elbow, arm and shoulder blade around the body efficiently whilst maintaining your draw arm connection. As you do this, you will bring the bow further into your natural bone alignment. This means that at full draw, the tension of the bow should mostly be held by your bone structure.
Importantly, the correct draw motion should minimise compression, tightness or discomfort in the shoulder joint. Therefore, this motion is key to reduce injury risk. When you reach full draw you want to use the mid and lower muscles of the back and minimise tension in the upper back and neck; drawing correctly will help you do this.
In the next section, we will look at the expansion stage of the shot. You can also checkout our Online Archery Academy YouTube channel for more in depth videos on the draw technique and every other area of recurve olympic archery. Or if you haven’t read it already, make sure to go through our Recurve Archery Basics guide.
1. Use the lower back muscles, and keep the upper traps and neck relaxed.
2. Continue leading your draw motion from the elbow.
3. Draw slightly below the chin, then come into anchor.
4. Think about the draw hand locating against the neck, not the chin or jaw.
5. Bring the string picture inwards from the setup position, to the side of the riser.
6. Reach real full draw by continuing to move the draw elbow round and come into final alignment before expansion.
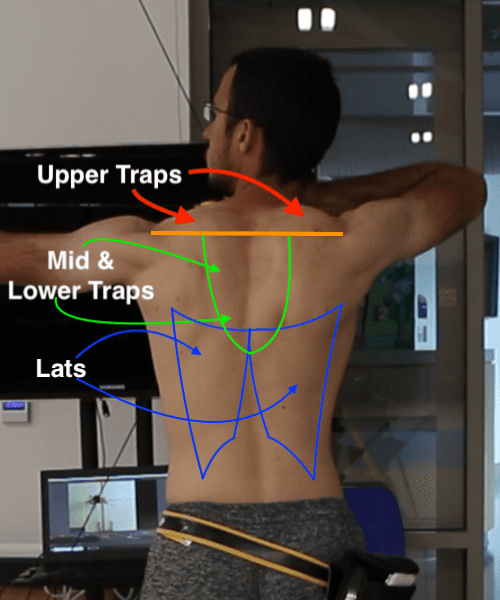
Before we get started, it is important to understand the muscles of the back and how we wish to use them. Fig 1. shows these muscles approximately.
As a general rule, throughout the whole shot we want to avoid using the muscles of the back above the orange line. Ideally, we want to use the muscles of the back below the orange line. This includes the mid/lower traps and the lats shown in Fig. 1. There are many other muscles involved too; this is a simplification to just the essentials.
Using the mid and lower muscles of the back has many benefits. Firstly, the lower back muscles combined are much larger than the upper traps. The lats alone are the second largest muscle in the body. So shooting with these muscles will be much less fatiguing. Second, using the lower back muscles will allow you room to expand smoothly and execute the shot properly. Compare this to using the upper traps which will lead to shortening of your draw length and a softer execution. Lastly, using the upper traps causes unnecessary tension around the neck and can cause the shoulders to raise up and become compressed under load; this increases injury risk.
Fig. 1 still shows a bit too much upper trap activation. You can see a great example of using the lower muscles of the back in Video 1 below.
To draw the bow from setup you must continue leading your movement from the draw elbow and maintain your draw side connection. You should direct the elbow around the body and behind you, this will close down the gap between the hand and the face to get to full draw. This motion is demonstrated best by the red arrow in the right hand image of Fig. 2.
In the left hand side of Fig. 2, the red dot traces the movement of the draw elbow along the orange line. Through this movement along the “V” shape path, the draw elbow is coming more into alignment and the hand is coming into the full draw position. A key point here is that the upper traps must remain relaxed throughout. You must pay attention when you are moving the elbow upwards along “path 2”. Many people lose direction here and allow the upward motion to cause tension in the upper traps. Also, the final elbow position should not be too high as that will cause you to use the upper traps more.
In summary, you need to keep moving the elbow in three directions through the draw motion.
1) It follows the “V” shape path.
2) It moves closer to the body, into better alignment.
3) It continues moving away from the target at all times.
As you draw the bow, it helps to draw slightly under the chin before coming to full draw. You can see this in Fig. 3 and Video 1 to the right. Drawing below the chin helps you to move the draw scapula around the body and into alignment in a way which allows you to use the lower back muscles properly, rather than the upper traps.
Drawing below the chin from set-up and then moving the hand upwards and inwards to full draw is a key part of using the correct muscles of the scapula and back. Most of the worlds top archers use this technique.
As you move from set-up to drawing slightly below the chin, the draw elbow traces “path 1” as shown in the left image in Fig. 2. Then, “path 2” is created as you move from below the chin into the full draw position. The result is the “V” shape path of the draw elbow.
The exact shape and size of the path is not crucial. The important part is to be able to move the scapula around the body properly (normally during the downward movement of “path 1”) and then move slightly upwards into the full draw position (path 2).
You can see a great example of this technique in Video 2 below, showing French international team member Thomas Chirault.
As you draw the bow come into your full draw position, how you think about locating your full draw position is critical. Most people think about bringing the hand into the chin and locating it there. This can lead to a variety of issues. Instead, you should think about the location of your full draw position against your neck. The placement of your hand along your chin and jaw will then follow.
The neck is much less likely to move during the shot than your chin. So using the neck as your primary feeling of anchor will allow you to get a much better alignment and reach real full draw. Often, when archers think about drawing to the chin, they will actually move the head to greet the string. This then makes reaching real full draw very hard.
When you draw below the chin and come to full draw, it is crucial to maintain your head position and keep your mouth shut. Don’t try and greet the string in anyway. Keep the head, jaws and mouth completely still.
In Video 3 you can see a good example of coming into full draw. The archer is focussing on referencing against the neck, and the draw hand position against the jawline and chin is secondary.