🎉 Transform Your Archery in 2025 with a Limited-Time 20% Discount On All My Guided Courses. Click Here to Learn More.

How To Tune A Recurve Bow

Table of Contents

How To Tune A Recurve Bow - Tuning Guide Part 1

INITIAL SETUP

Before you learn how to tune a recurve bow, you’ll need to start by assembling everything together. This includes the arrow rest, clicker, sight, stabilisers…etc. Place everything approximately at this stage. Now you’re ready to start.

You should then always start your recurve tuning by setting the proper nock fit, poundage, and tiller for your bow. You can slightly vary the poundage of your bow to help your tuning, but it is best to set the poundage to something you can manage at the start and try to stick with it. If you shoot a bow which is too heavy for you, it doesn’t matter that your tuning is good because it will be hard for you to shoot it properly.

If you’re not sure what bow weight you can manage, have a look at our 7 Plus 2 Test. This will help you find a good bow weight.

Become an OAA Member + Join My Community

Get unlimited access to all OAA website content. 

Plus join my community for Q&A’s, exclusive videos, training programs and much more!

NOCK FIT

The way your nock fits on the string has a huge impact on recurve tuning. And it also changes the way the bow sounds. You need to use a centre serving thickness which gives you the right nock fit for your string and nock choice. Read our Complete Guide to Proper Nock Fit which includes a handy chart to find the perfect nock for you.

Indicators of good nock fit are:

1. The nock firmly clips onto the string with a crisp audible ‘click’.

2. The ‘ears’ of the nock slightly widen and then close back down as it clips on to the string.

3. When you rotate the nock around the string, it doesn’t grab and rotate the string with it.

4. The nock can’t move a large amount back and forth when it’s clipped to the string. A very slight amount of play is ok.

5. You can displace a hanging arrow from the string by a firm tap a couple of inches from the nock.

POUNDAGE

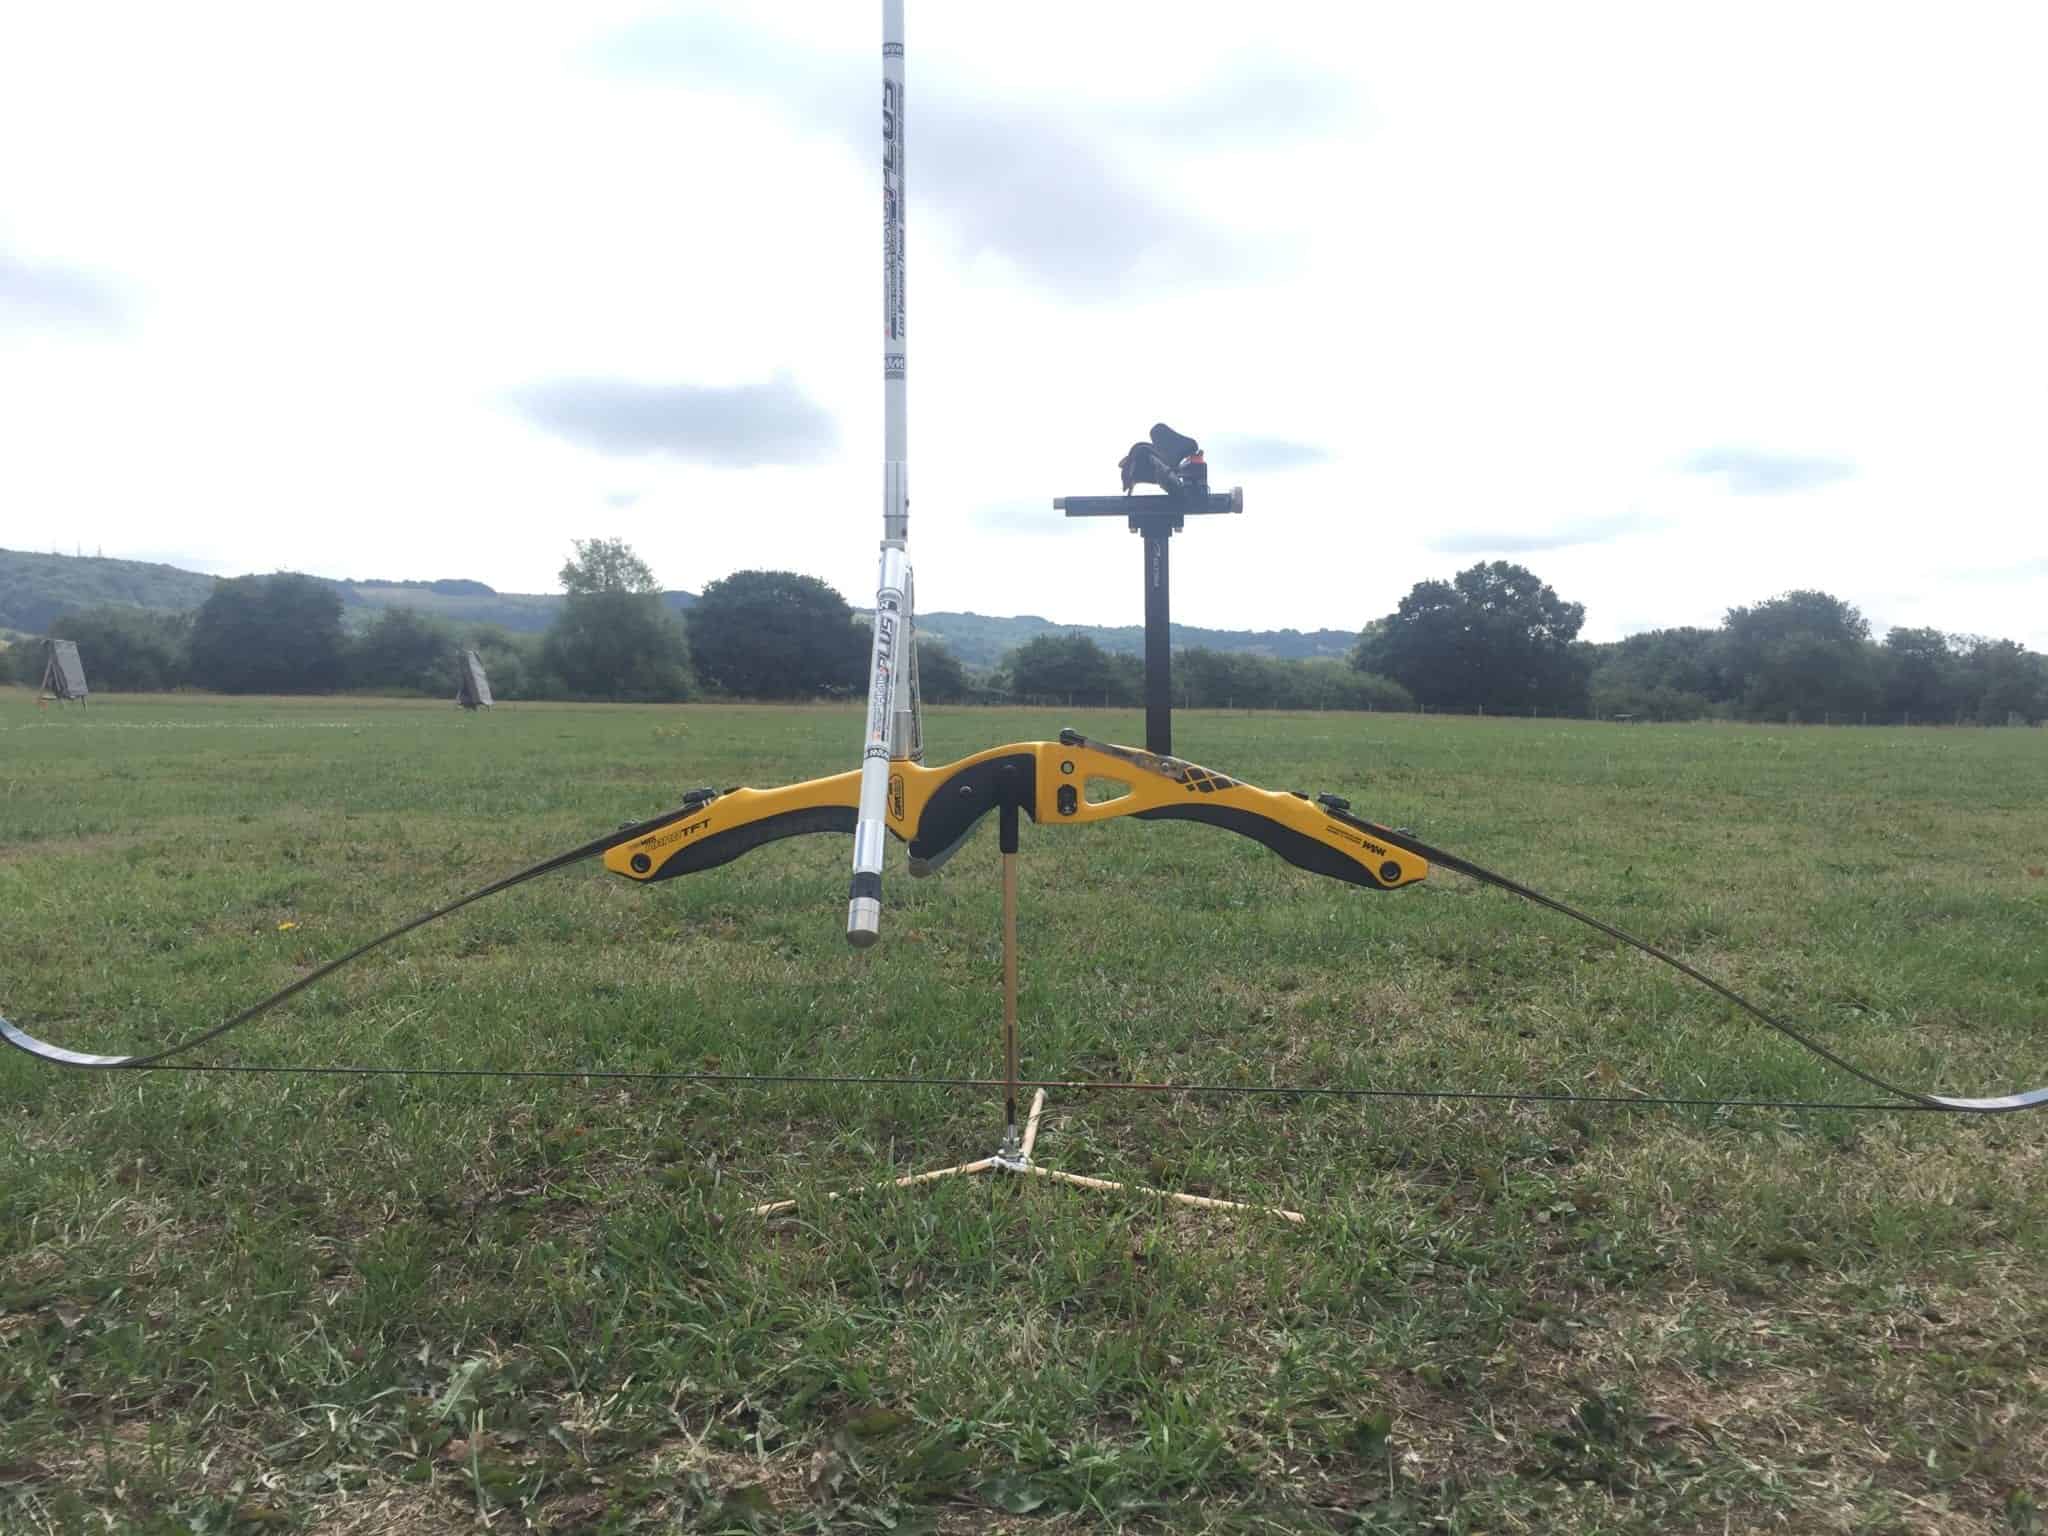
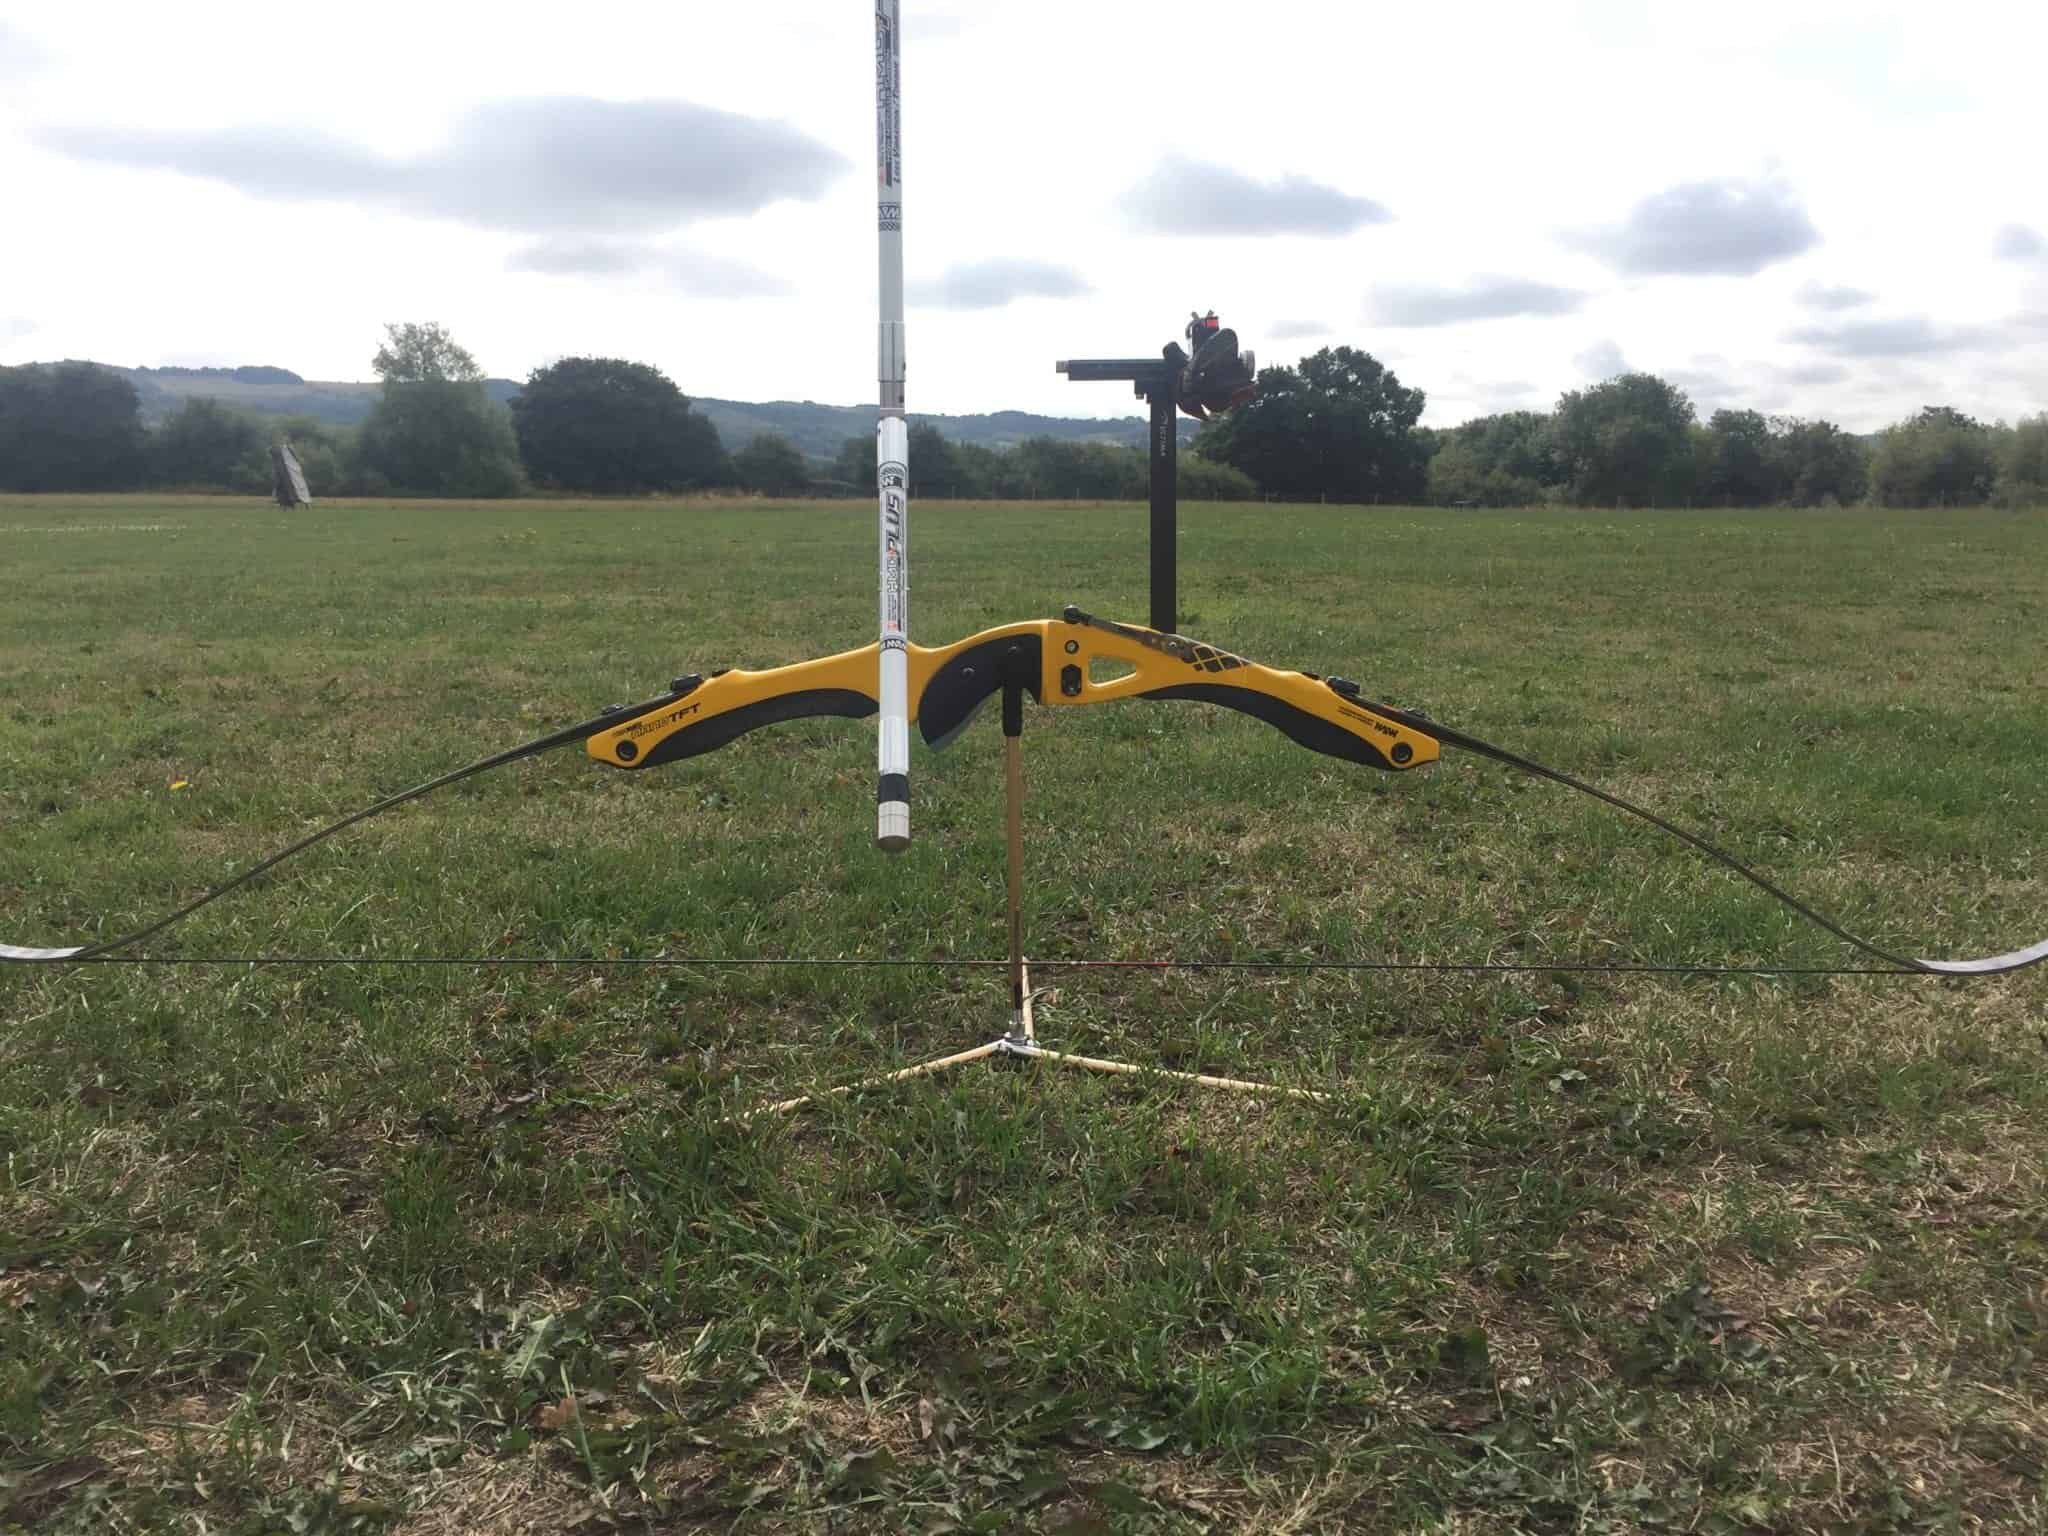
Use a pair of scales (luggage scales work fine) to draw up your bow at close distance. When the clicker drops at full draw, this is your draw weight. Then simply turn the limb bolts (see Fig. 1) on your bow until you reach the weight you want. Make sure to un-string your bow before doing this. Lastly, make sure the string doesn’t press against any place on your body when you measure the draw weight, as this will give a false high reading.

win and win axt showing limb bolt tiller adjustment
Fig 1. The limb bolt

The limb bolts are very adjustable, and you can use them to adjust poundage. However, you ideally want to keep them close to the middle position. The limbs can be critical if the bolts are too far in. Having the bolts too far out can give the same issue, as well as potentially being dangerous. Check your bow manufacturers handbook for the minimum number of inward turns that are required to have the limb bolts in a safe position.

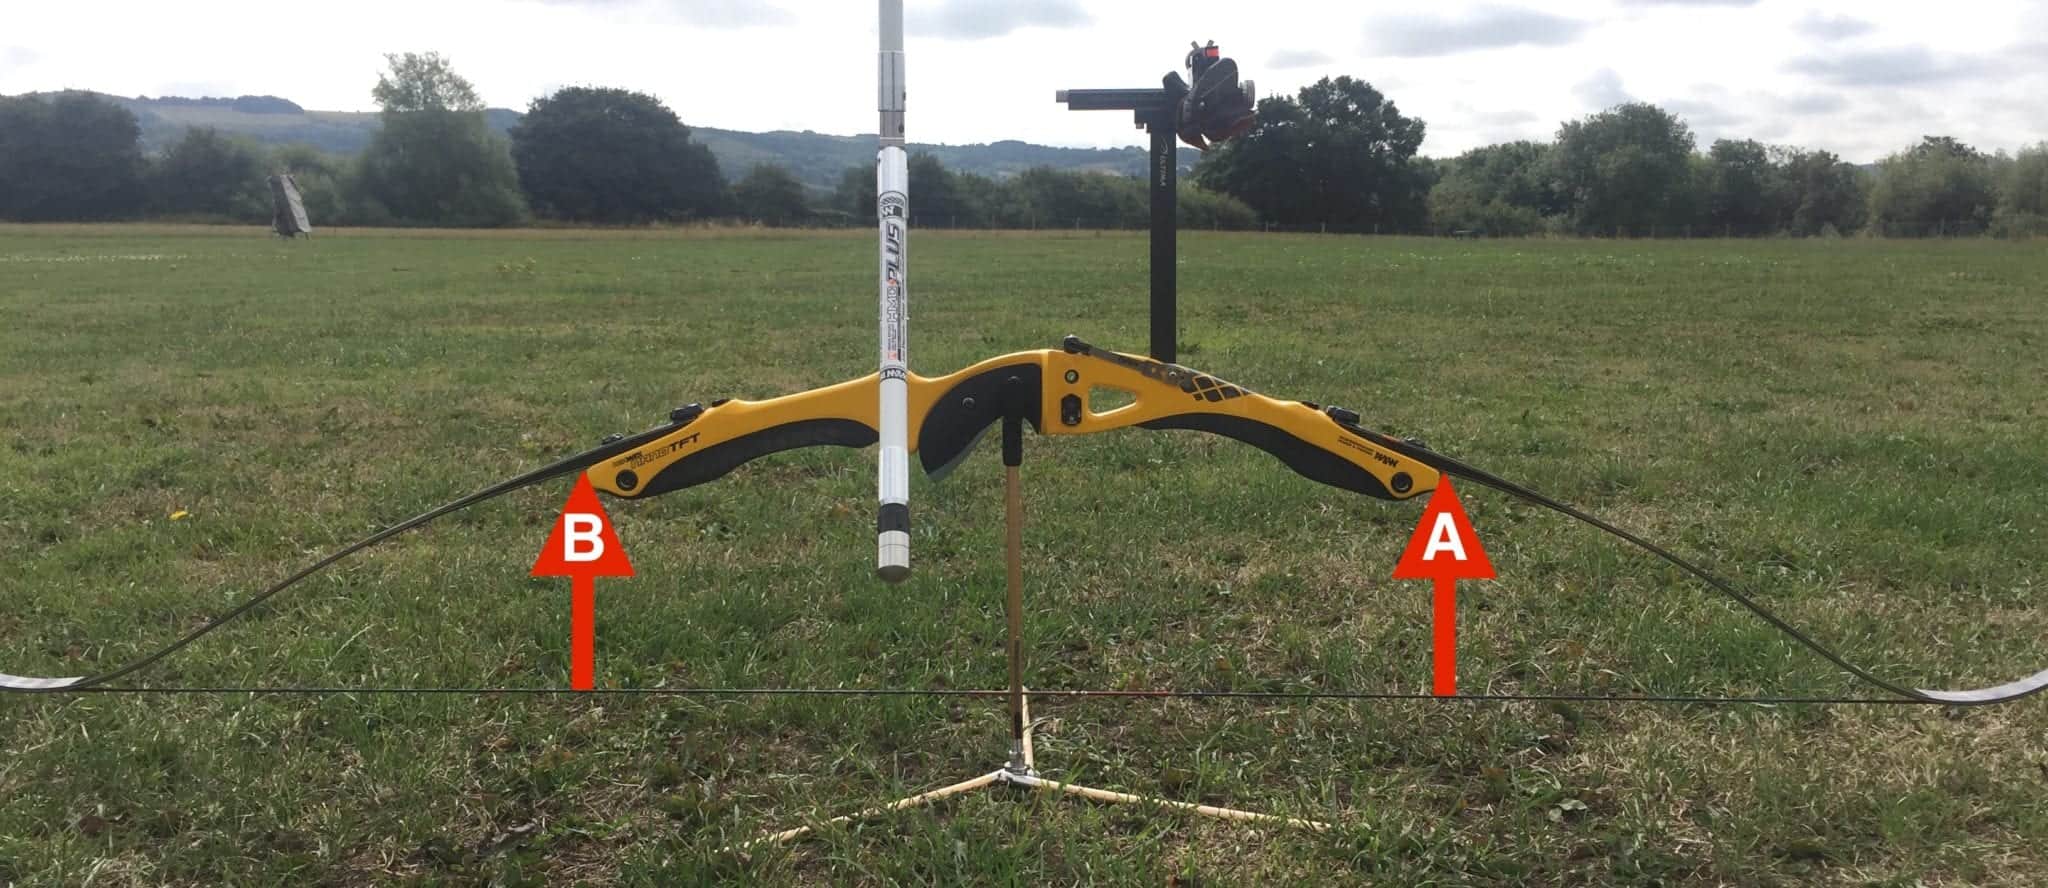
When the limb bolts are in the ideal position, the curve made by one limb will smoothly continue through the riser and into the other limb. You can see in Fig. 2 examples of the limb bolts when they are in the correct position (Fig 2b), too far out (Fig 2a) and too far in (Fig 2c).

Recurve limb bolt adjustment range
Fig 2a. Limb bolts too far out
Recurve tiller bolt adjustment range
Fig 2b. Correct limb bolt position
Limb bolt adjustment maximum when doing recurve tuning
Fig 2c. Limb bolts too far in

TILLER

The tiller of a bow is the slight difference in the draw weight of the top limb versus the bottom limb. You can calculate this by measuring the distance between each limb and the string when the bow is strung. You can see this in Fig. 3. Measure this distance using a brace height gauge placed against the inside surface of the limb. Then simply read the distance mark against the string at its shortest point.

If the top limb-to-string distance is larger than the bottom limb-to-string distance, you have a positive tiller. If the reverse is true, you have a negative tiller.

A good starting point for your tiller is normally +0-4mm. Most people shoot a positive tiller. Importantly, you should adjust the poundage and tiller together as they are linked.

demonstrating recurve tiller tuning and measurement
Fig 3. How to measure tiller

How To Tune A Recurve Bow - Tuning Guide Part 2

BOW ALIGNMENT AND SETUP

The next stage tuning a recurve is to setup and align your bow. This starts with limb alignment, followed by setting the centre shot and finally the sight alignment. If you setup and align your bow properly here it makes the rest of the tuning process much easier. Many people struggle with limb alignment, but follow the steps below and it should be simple. 


LIMB ALIGNMENT PRECAUTIONS

Aligning the limbs makes sure they are straight in the bow and that when you draw them, they draw and shoot in a straight line. Having the bow and limbs in alignment is good for a number of reasons. It can make the bow react better, shoot more quietly, be more forgiving, and it makes setting the centreshot easier.

 
Precautions Checklist:

1. Limb gauges can become deformed over time if they are squashed or bent in storage.

2. Gauges rely on the limb width and coating being consistent to get a consistent reading. However, most manufacturers coat the limbs with lacquer or sand the limbs during production. This sometimes means the limb gauge sits slightly off centre but the limb is actually straight.

3. Because of this, always check the alignment without limb gauges as well as with limb gauges. Don’t blindly follow limb gauges.

4. Also use multiple limb gauges, not just one on each limb.

5. Always un-string your bow when changing limb alignment or poundage. Pluck the string a few times before checking the alignment again, or ideally shoot a few arrows.

6. If the long rod is not aligned with your bow, make sure the long rod isn’t the issue first. Remove any soft plastic washers between the stabilisers as these can become squashed on one side and cause the extender/v-bar/longrod to angle to one side.

7. If you start going round in circles, and find it hard to align your bow. Remove the limbs, reset the limb alignment setting to the middle starting position and start again.

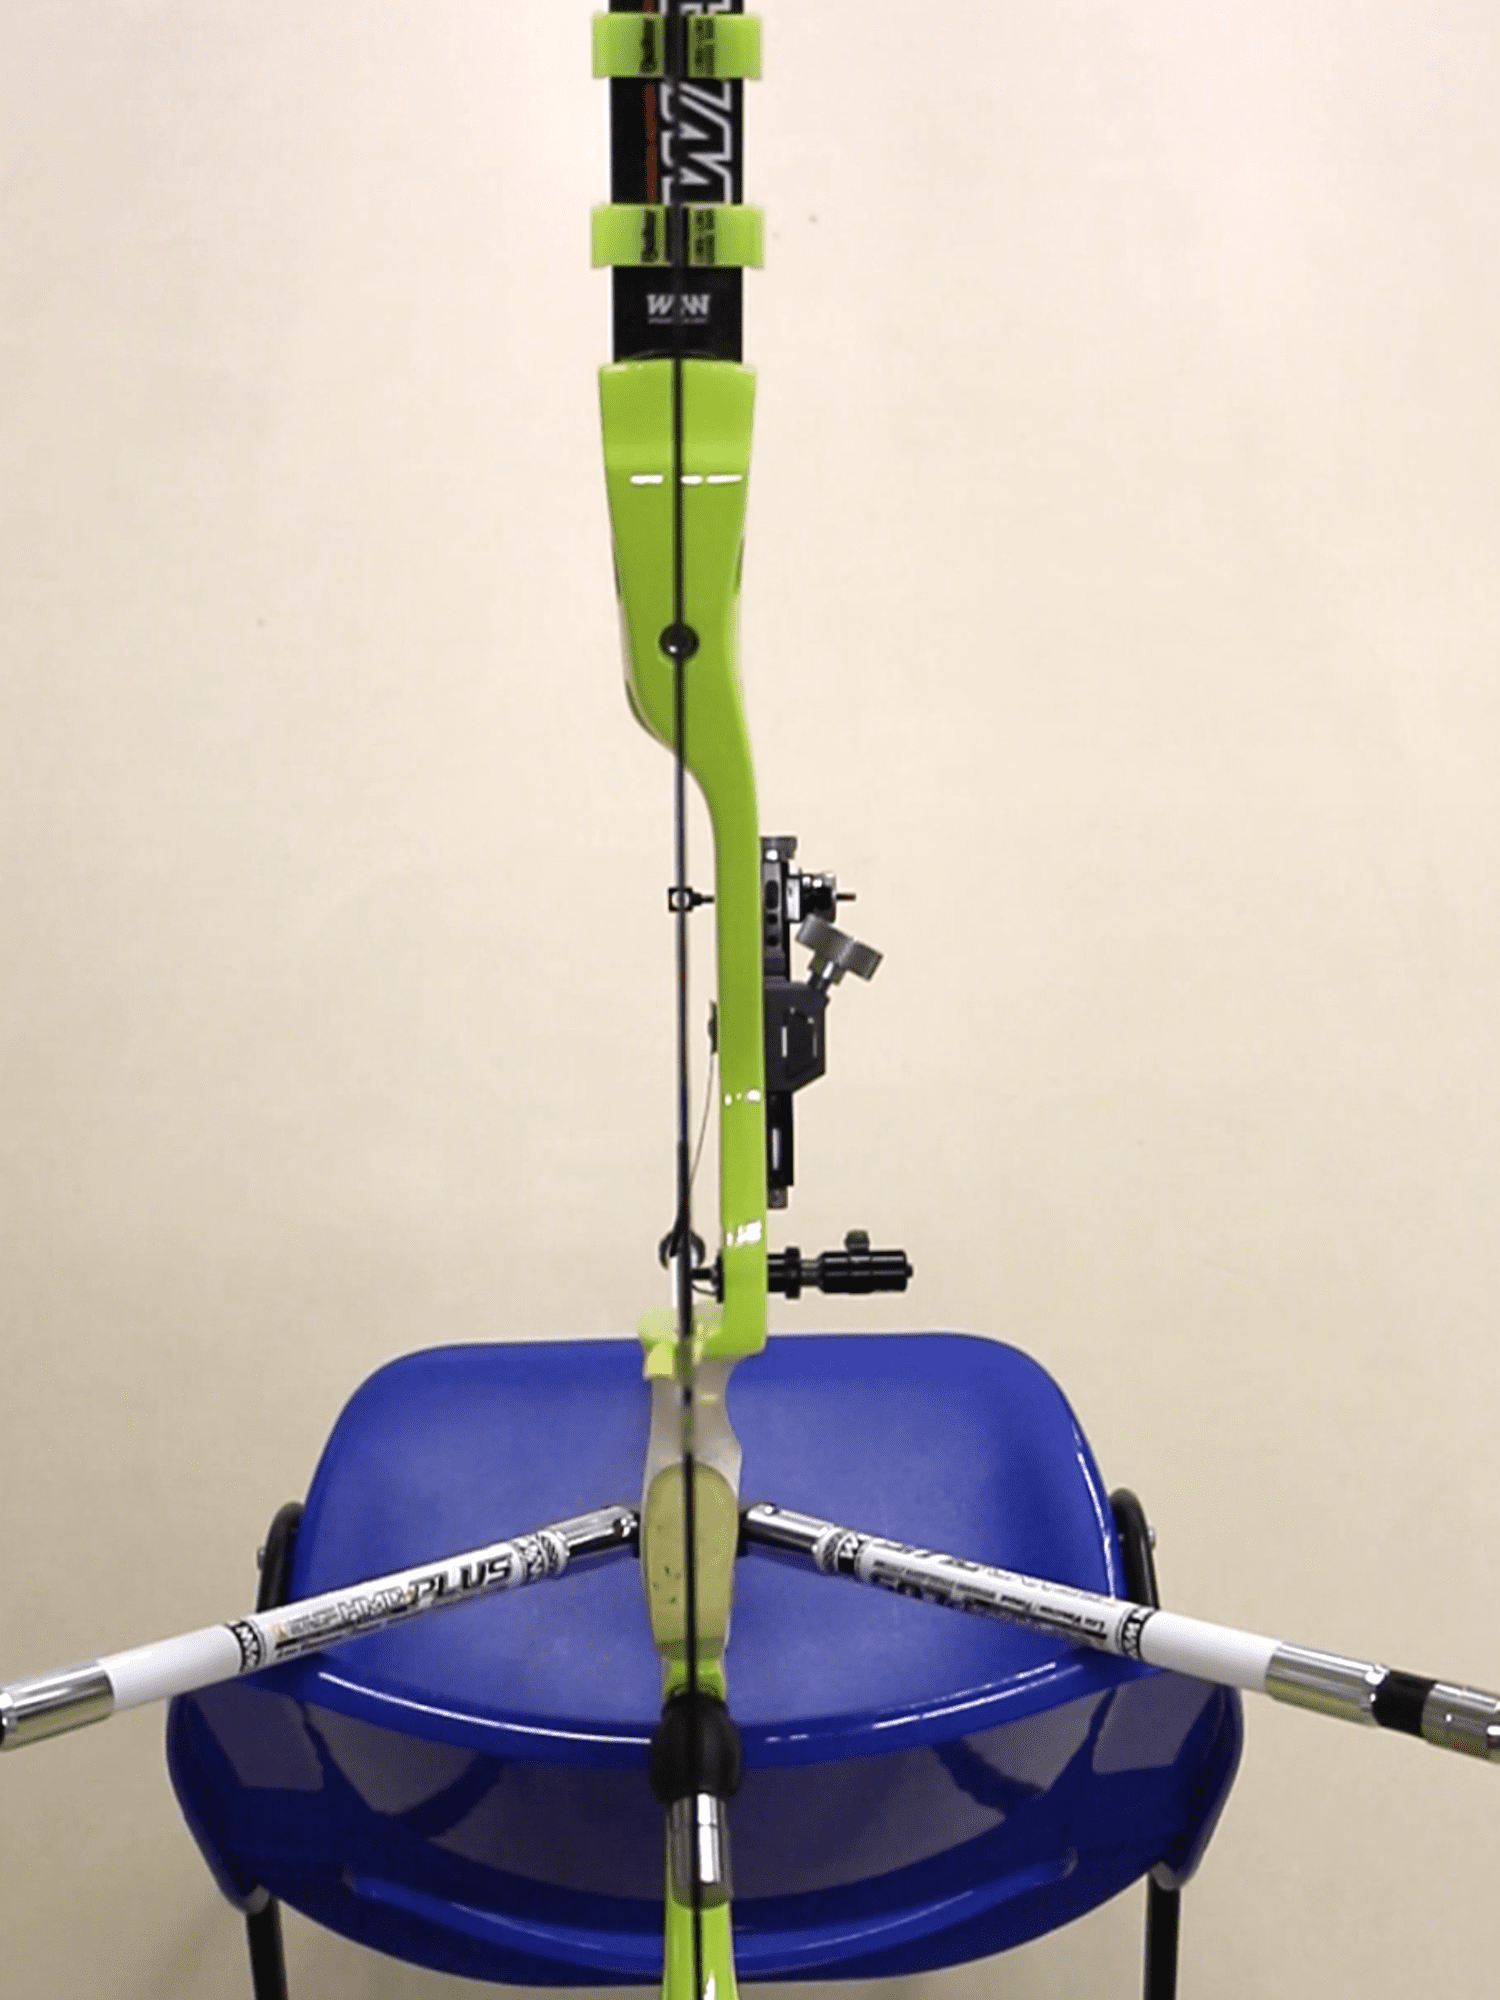
Start by stringing your fully set-up bow and placing it on the back of a chair or bench as shown in Fig. 4. Then place the limb gauges on your bow as you can see in the pictures

W&W TFT showing limb alignment process
Fig 4a. Bad limb alignment
Good recurve limb alignment with a W&W TFT riser
Fig 4b. Good limb alignment
Recurve limb alignment check with the W&W TFT riser
Fig 4c. Good limb alignment check

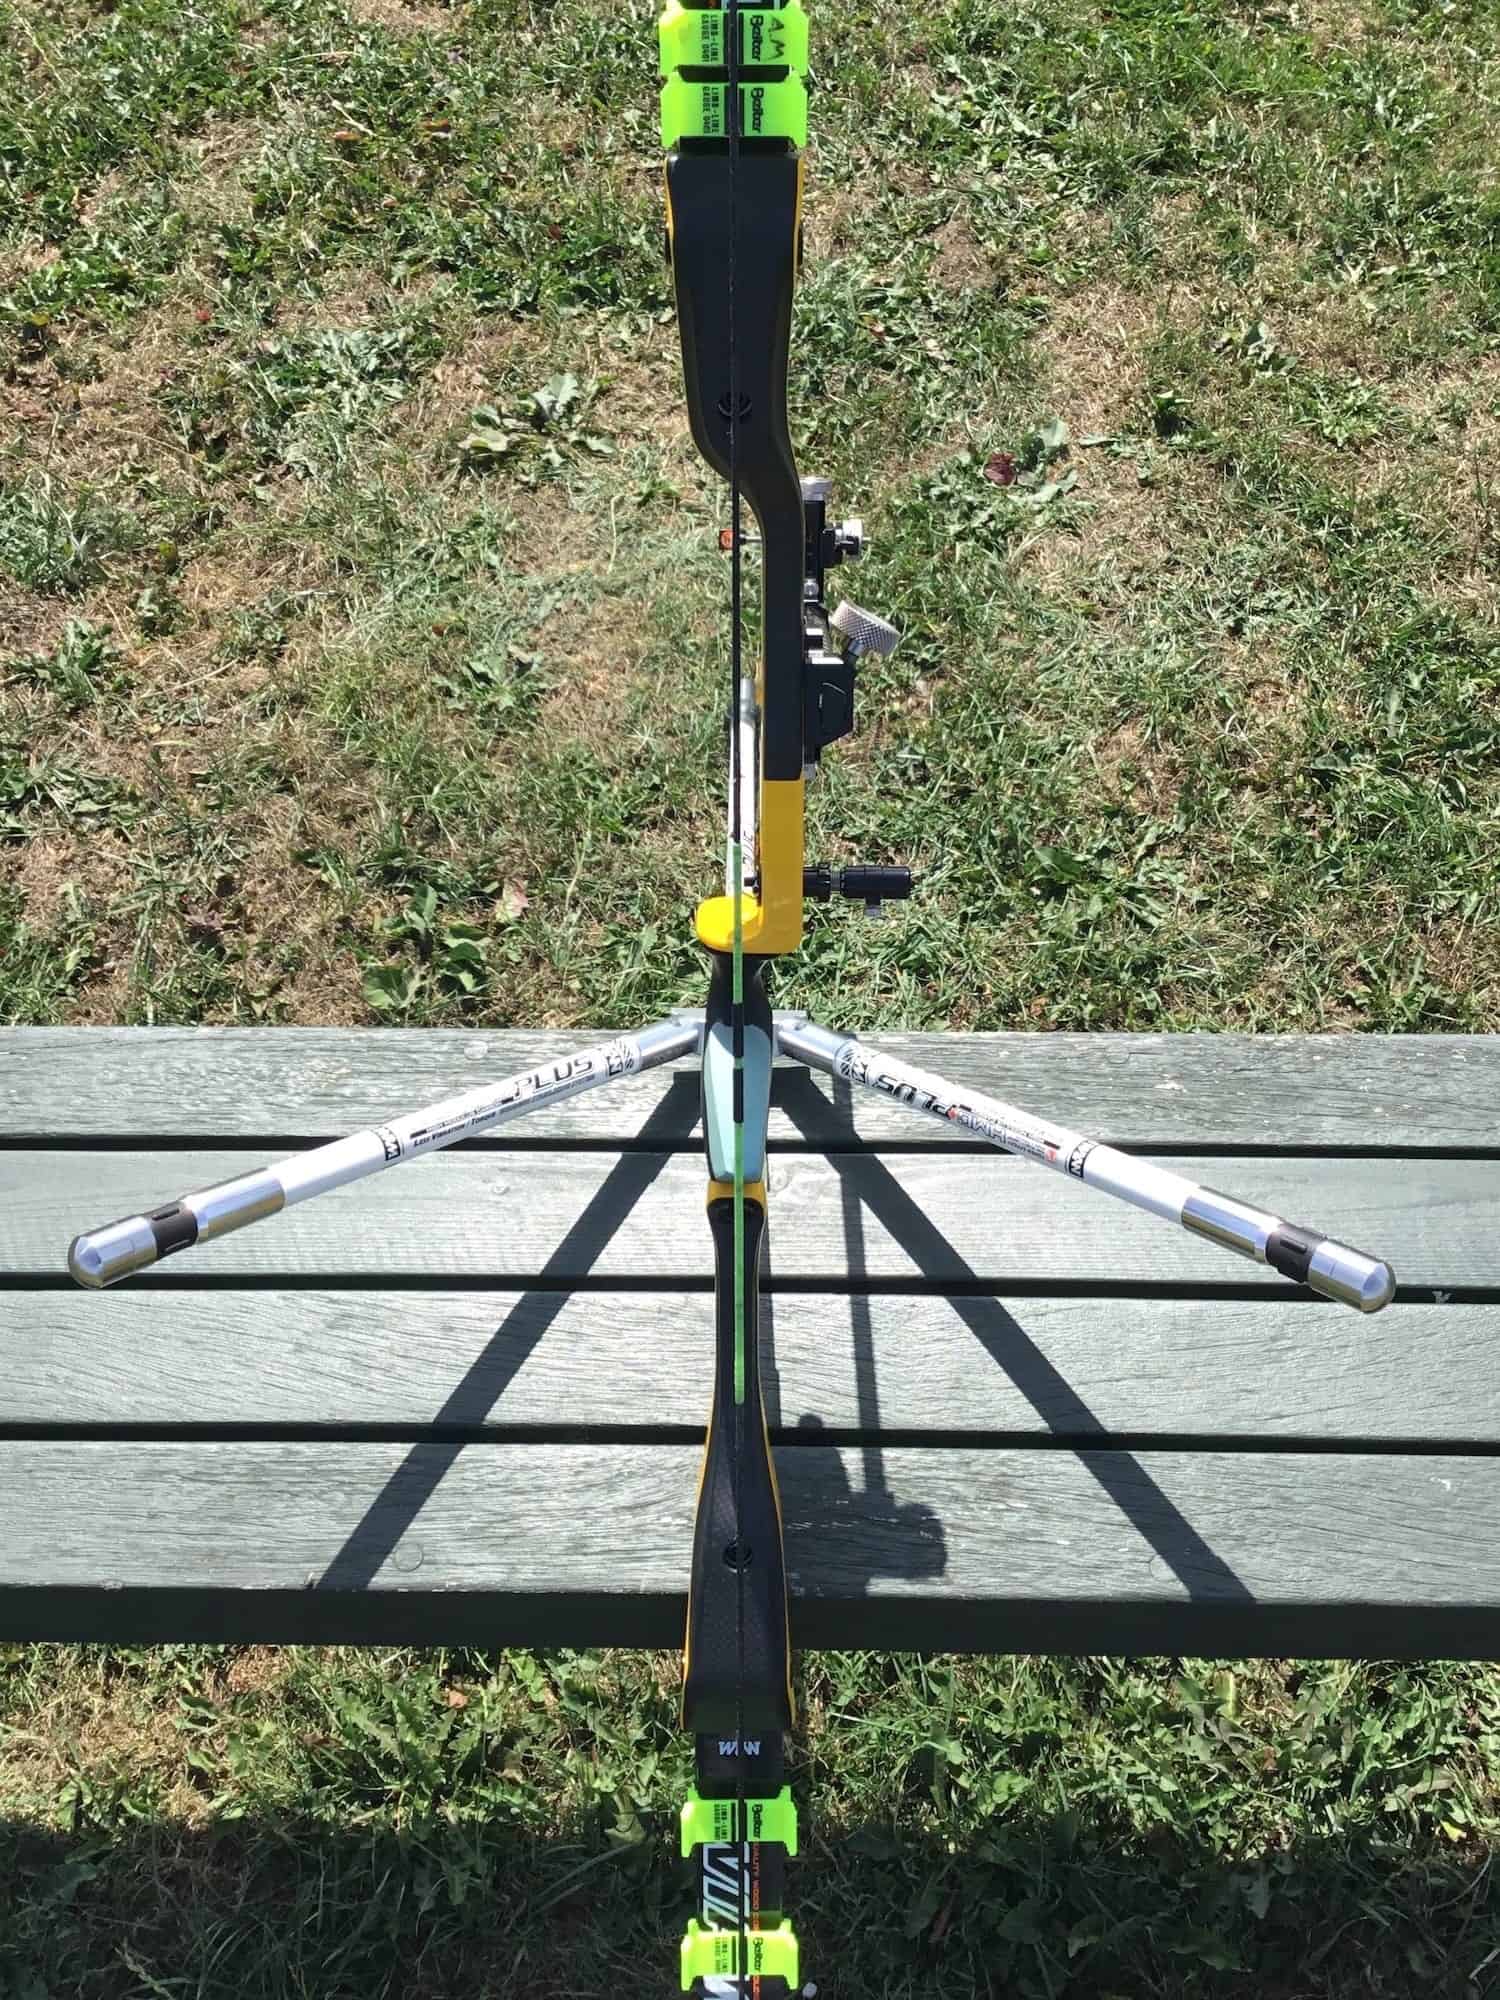
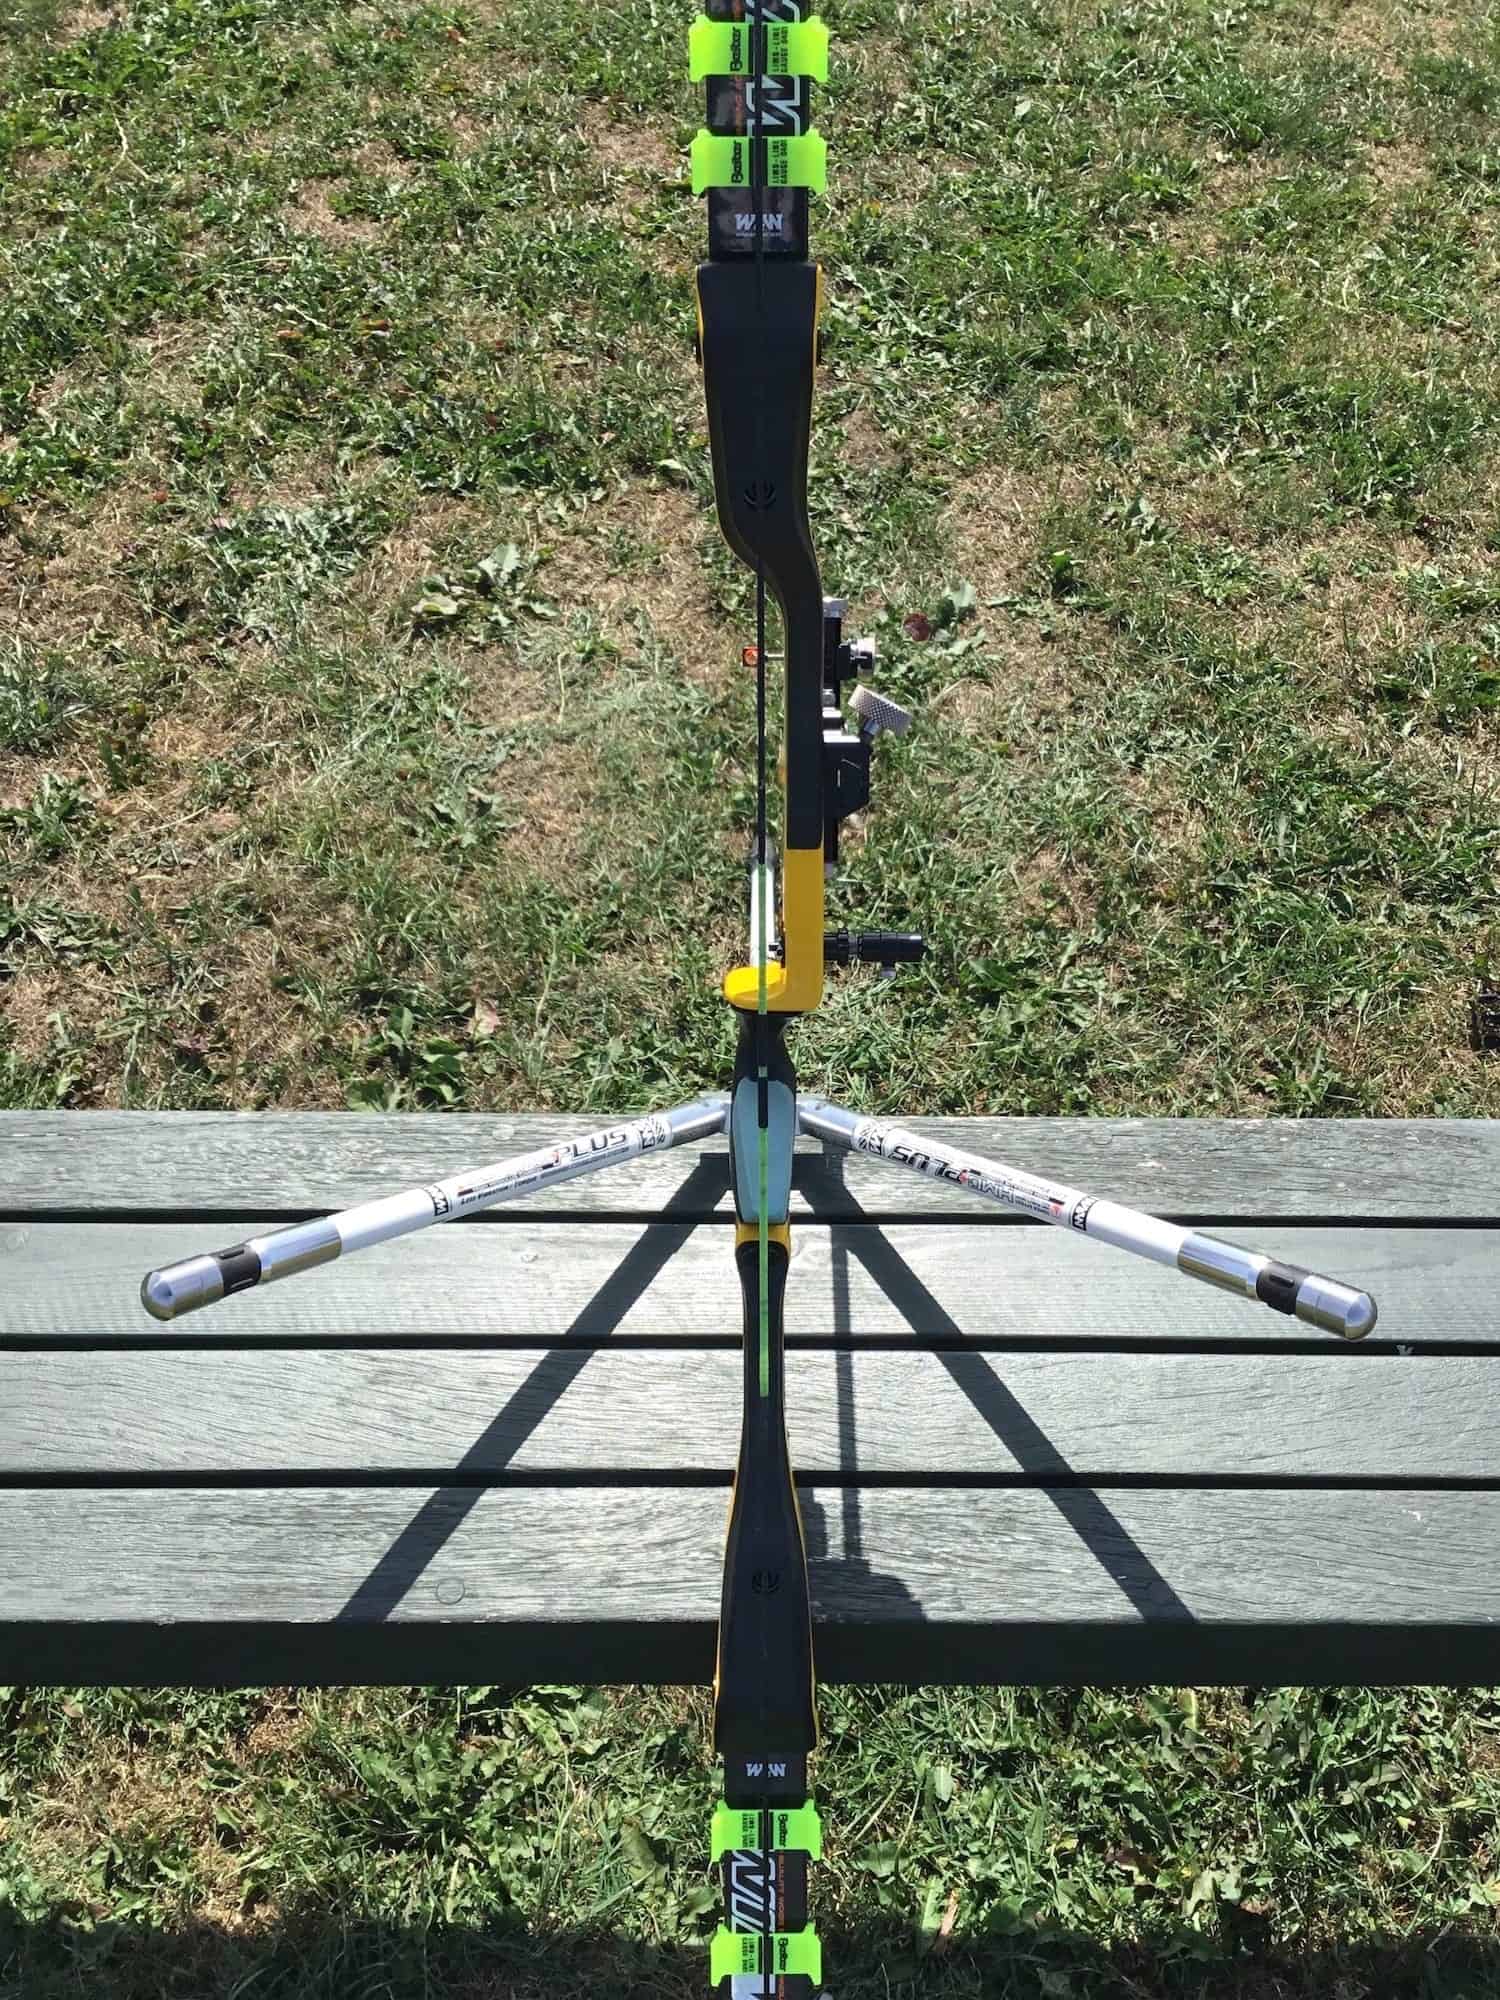
You can see in Fig. 4b the correct alignment that we want. The string runs down the middle of the limb gauges and through the centre of the riser and longrod. It is possible for you to see the inside face of the riser slightly too (the side where the arrow rest touches). This is correct.

As we suggested, it is good to check the alignment without the limb gauges too. You can see in Fig. 4c the limb alignment without the gauges. The alignment is still good by aligning the string with the centre of the riser holes. Don’t align with the screws as these can be wonky when tightened. Also, the limbs still look aligned with the bow and the longrod is aligned too. This is good. The starting point for this was the bad position which is shown in Fig. 4a. Now we will show you how to do this.

LIMB ALIGNMENT METHOD

1. If the gauges line up with each other but the long rod is off, move BOTH limbs  in the opposite direction to the longrod. This is from the direction we look at the bow in Fig 4. I.e. if the longrod is left, move both limb bolts to the right.

2. If you can’t align the limbs with each other. Align the string with the limb which is most aligned with the longrod. This is the top limb in Fig 4a.

3. Now align the string with the other limb. This is the bottom limb in Fig 4a. Whichever way the longrod is angled, you need to move THIS limb the opposite way. For our example in Fig 4a, we need to move the BOTTOM limb to the LEFT.

4. Once you’ve adjusted. Simply repeat the steps above until the limbs are aligned with each other, the riser and the longrod.

5. After adjusting the bottom limb, you can see the change from Fig 4a to Fig 4b. The bow is now in good alignment. 

6. Finally, check the alignment without limb gauges as shown in Fig 4c.

7. Tighten everything down and shoot a few arrows. Then re-check the alignment one last time.

NOTES ON LIMB ALIGNMENT

This procedure works regardless of which bow you shoot. Although the adjustment system may be different, the process to follow is the same. Think about which way you need to move the limb and it works for any riser.

In Fig. 4a, you can actually see that the longrod is still pointed to the right when the string is lined up with the top limb. This means that we may need to move both limbs. However, we correct the limb which is furthest away first. Then we re-check the bow and see if we need to adjust anything else. In this case, we only needed to move the bottom limb. Over time you will develop a sense of how much adjustment you need to correct a misalignment. As a rough guide, to correct the offset position in Fig 4a the bottom limb will probably need to be moved between 1/8 and 1/4 of a turn.

CENTRESHOT SETUP

The centreshot is a slight adjustment of the arrow position compared to being in perfect alignment with the bow. There is no ‘correct’ centreshot and it varies for different people. It can depend on your technique and tuning.

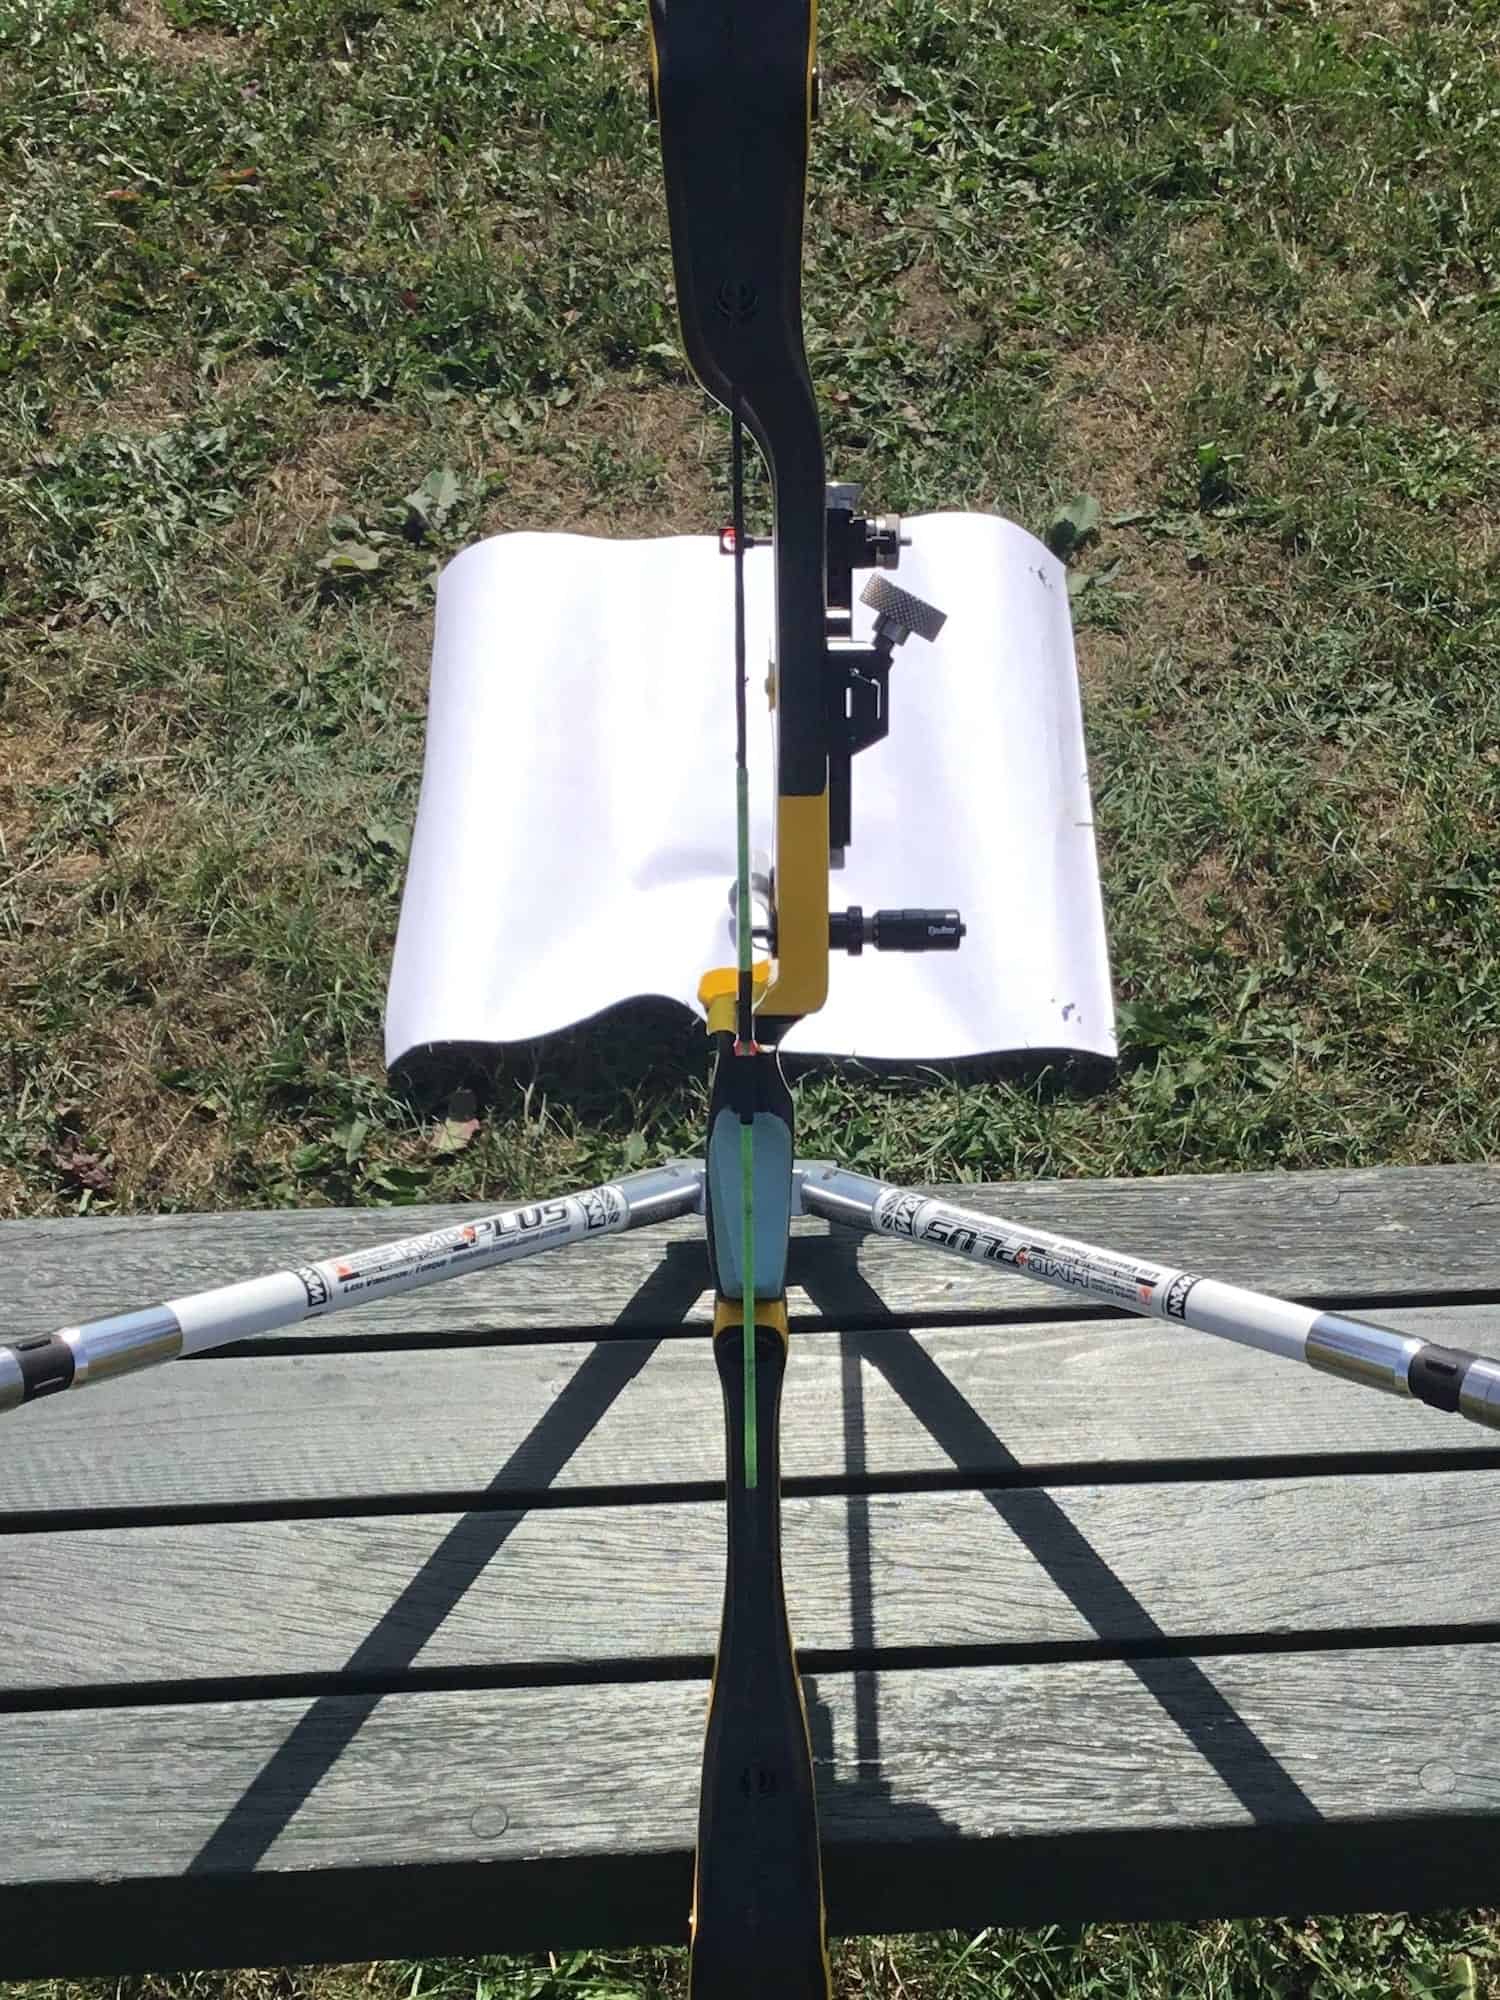
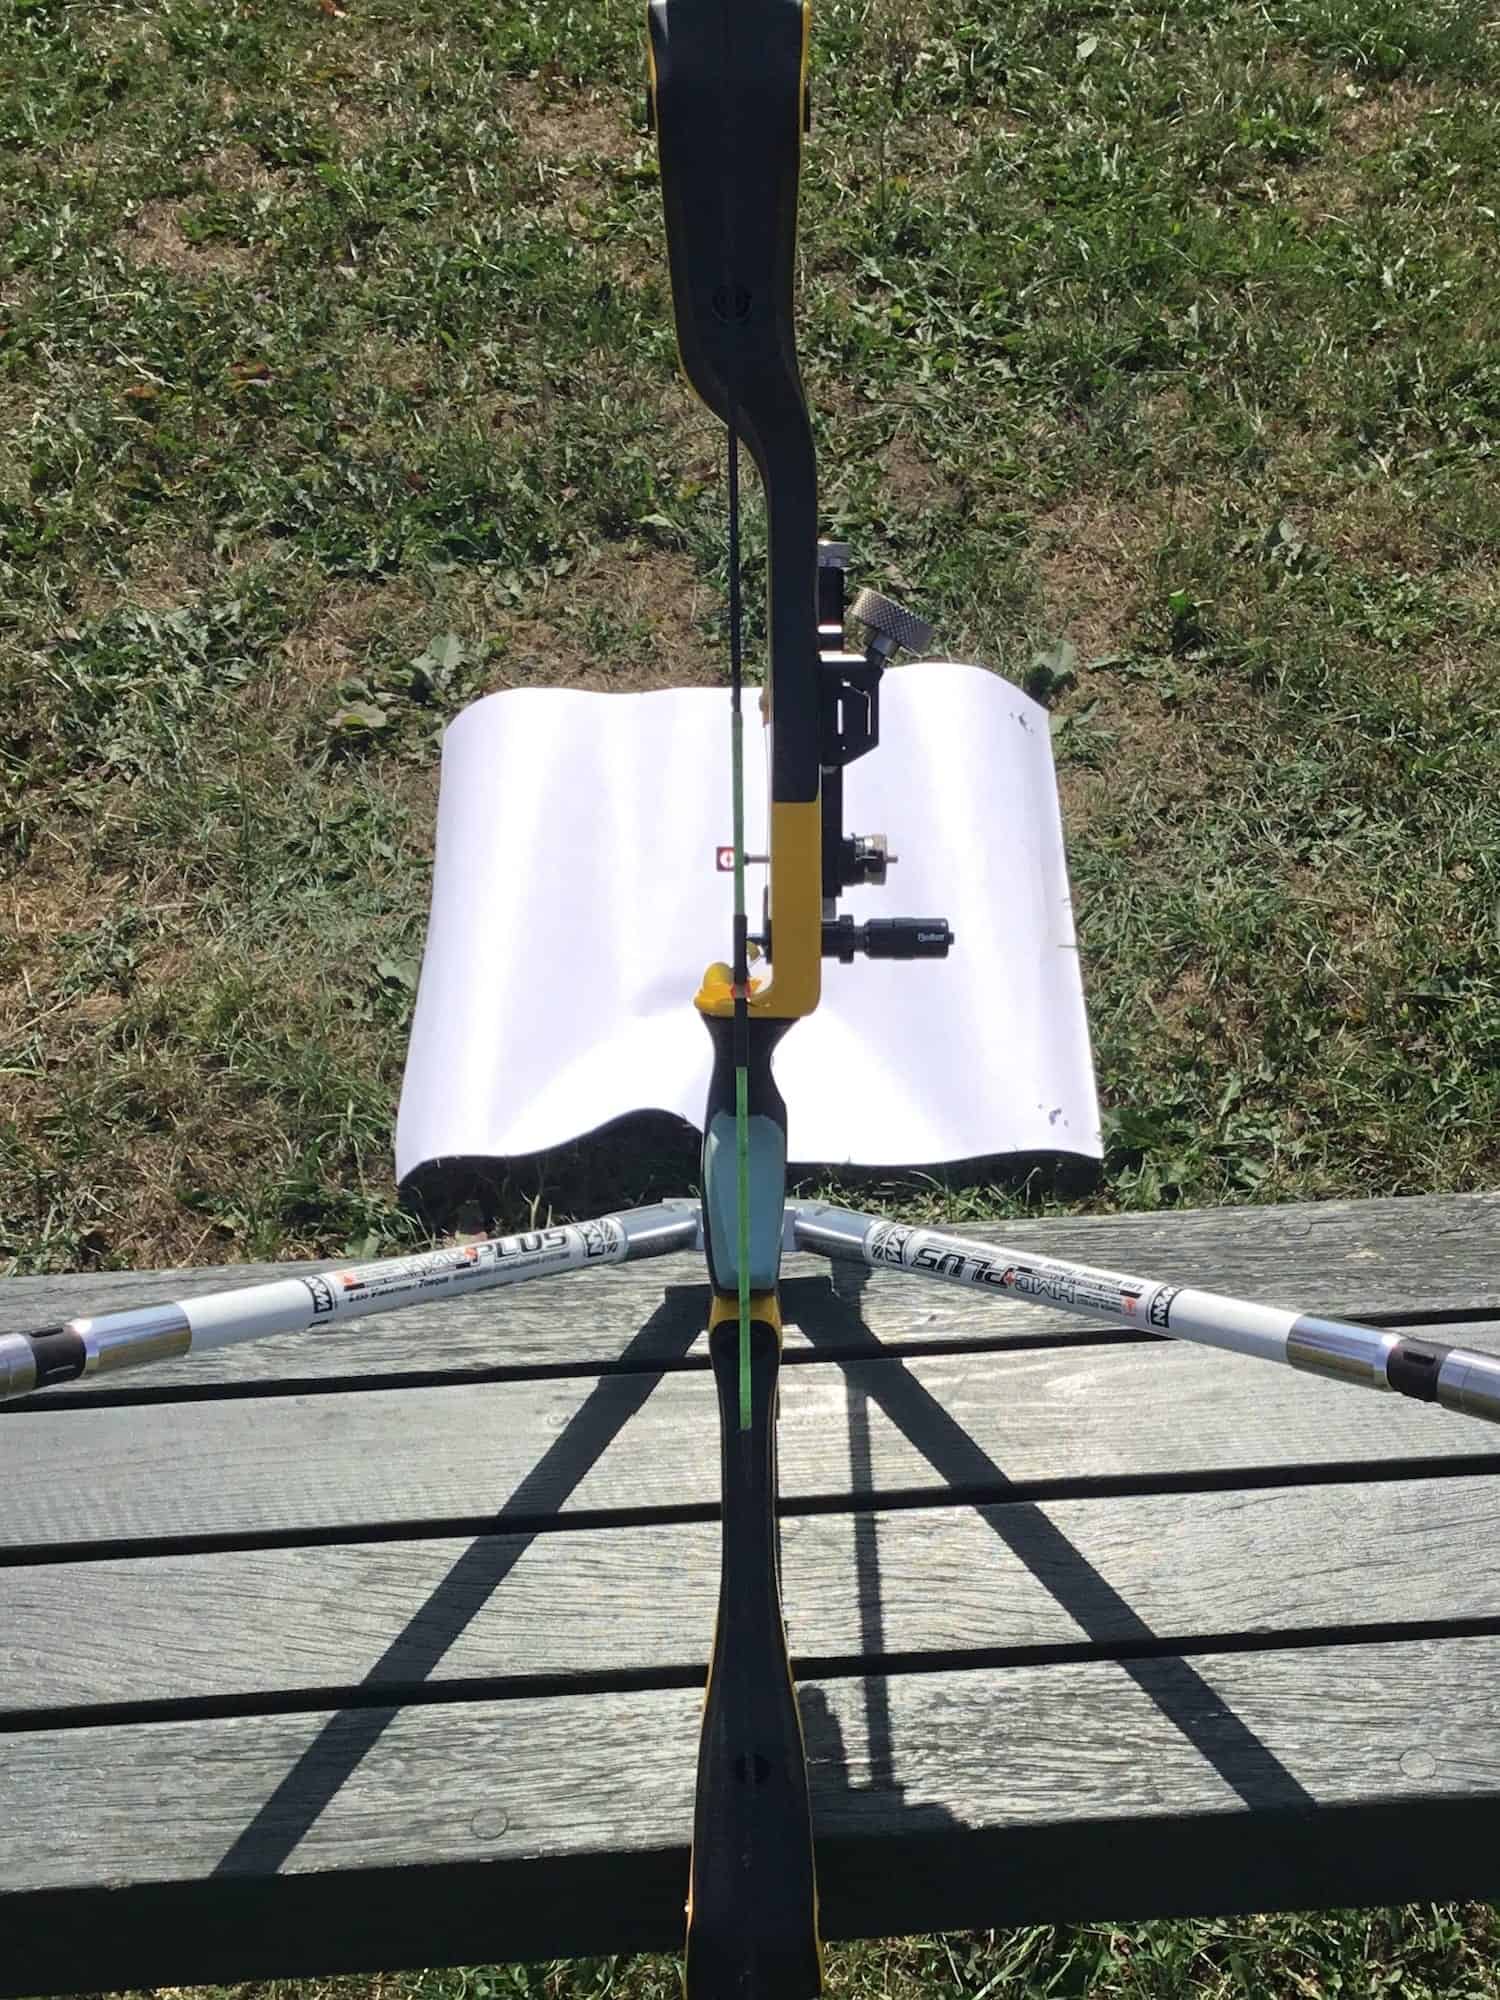
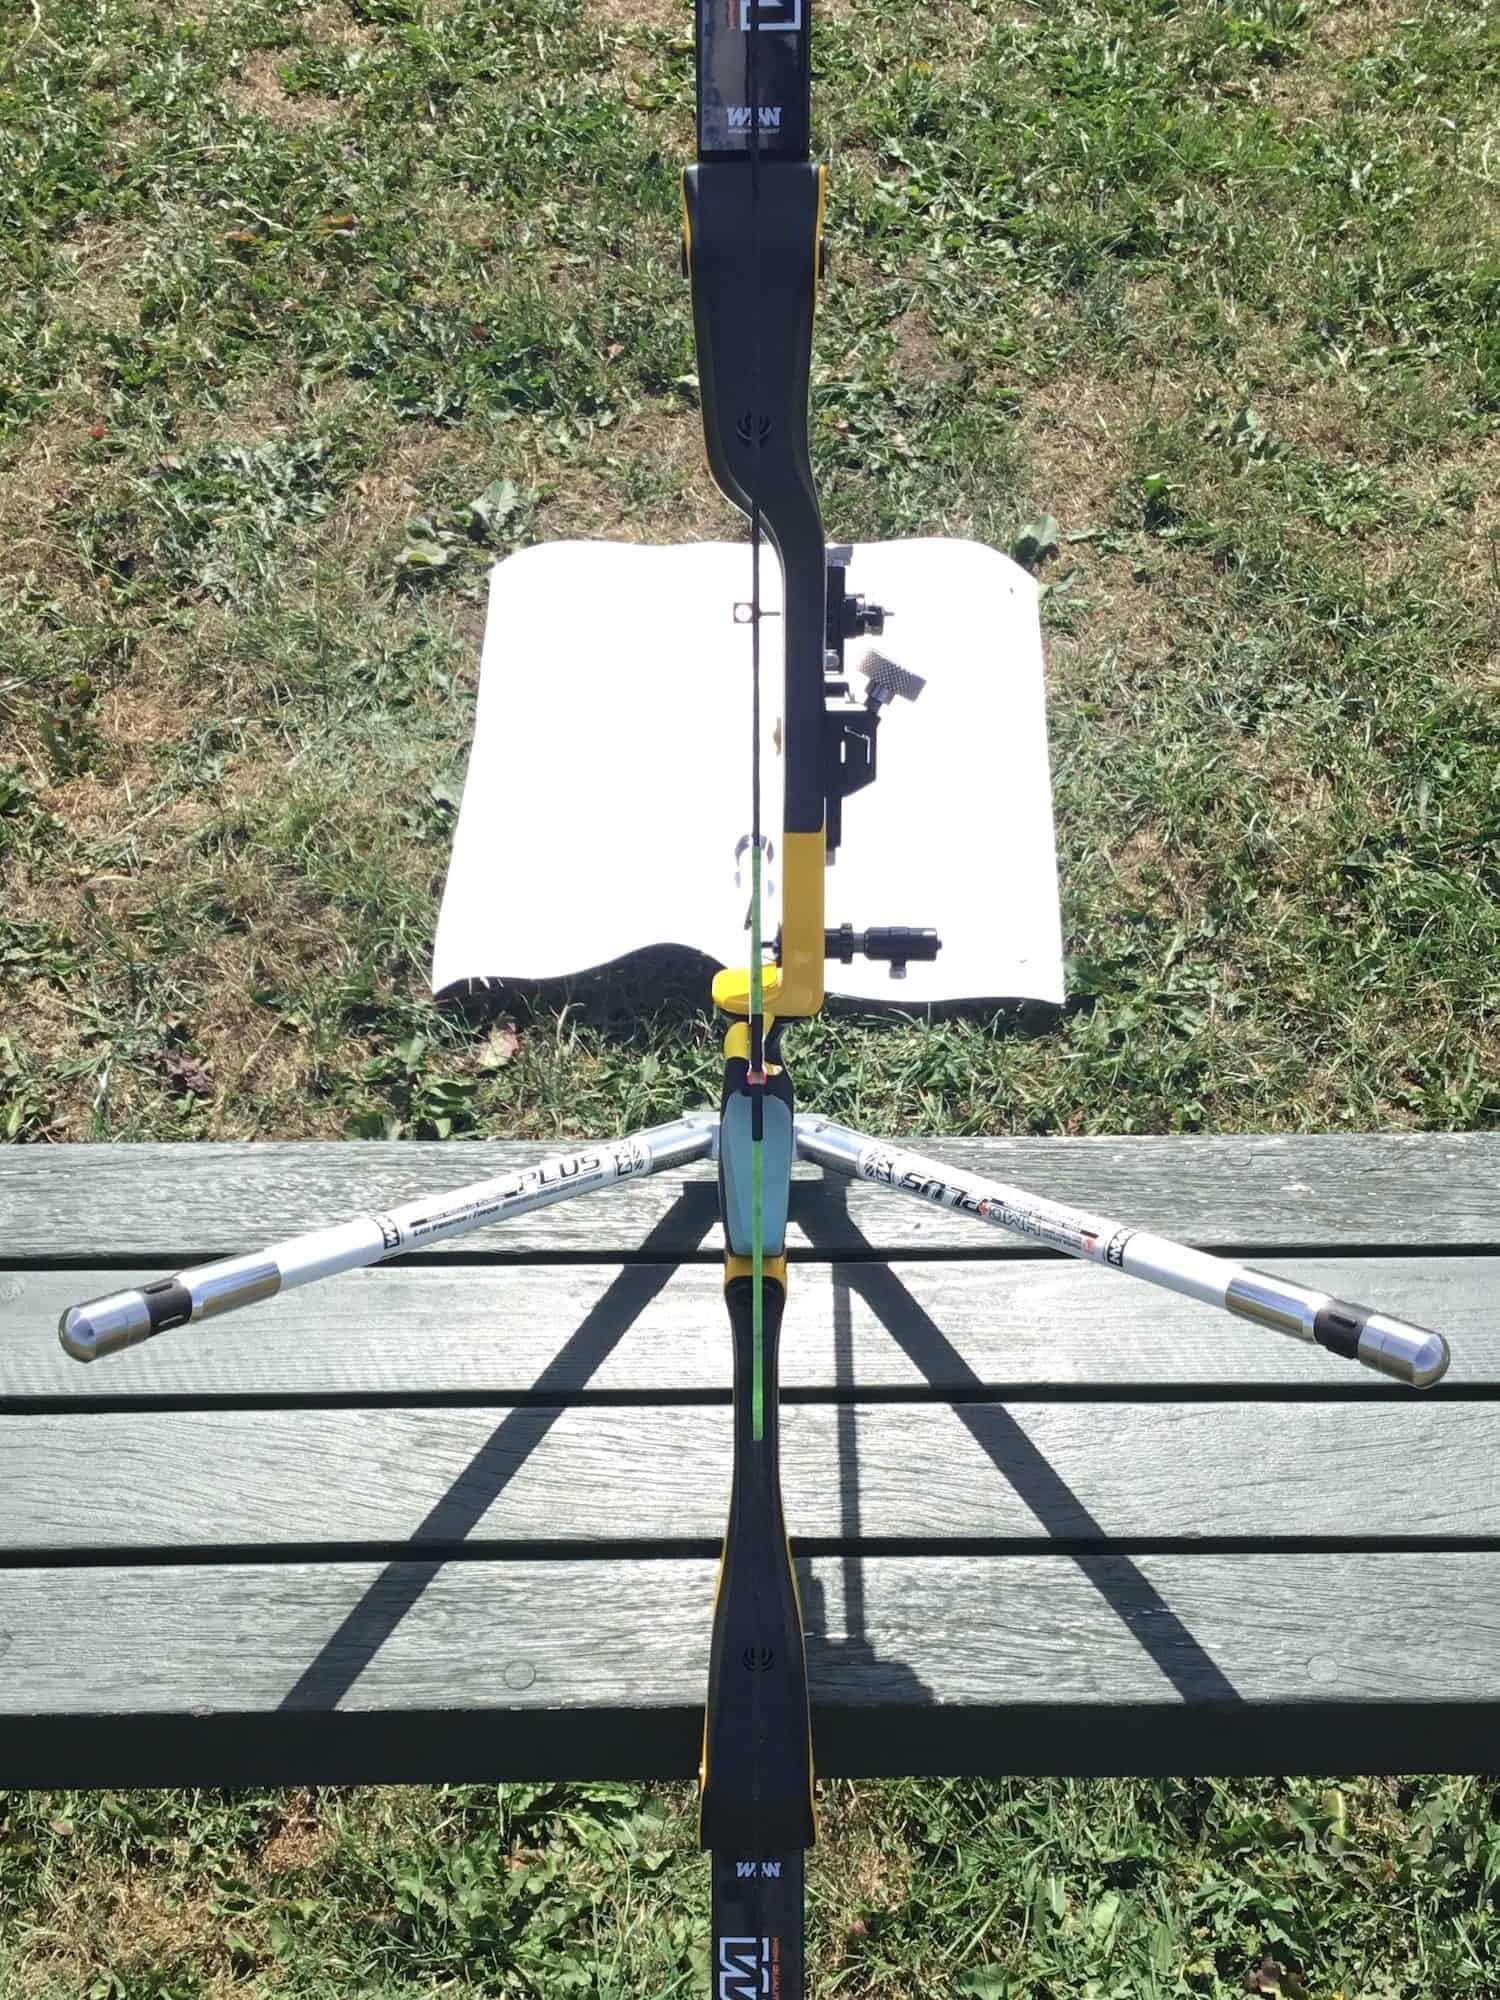
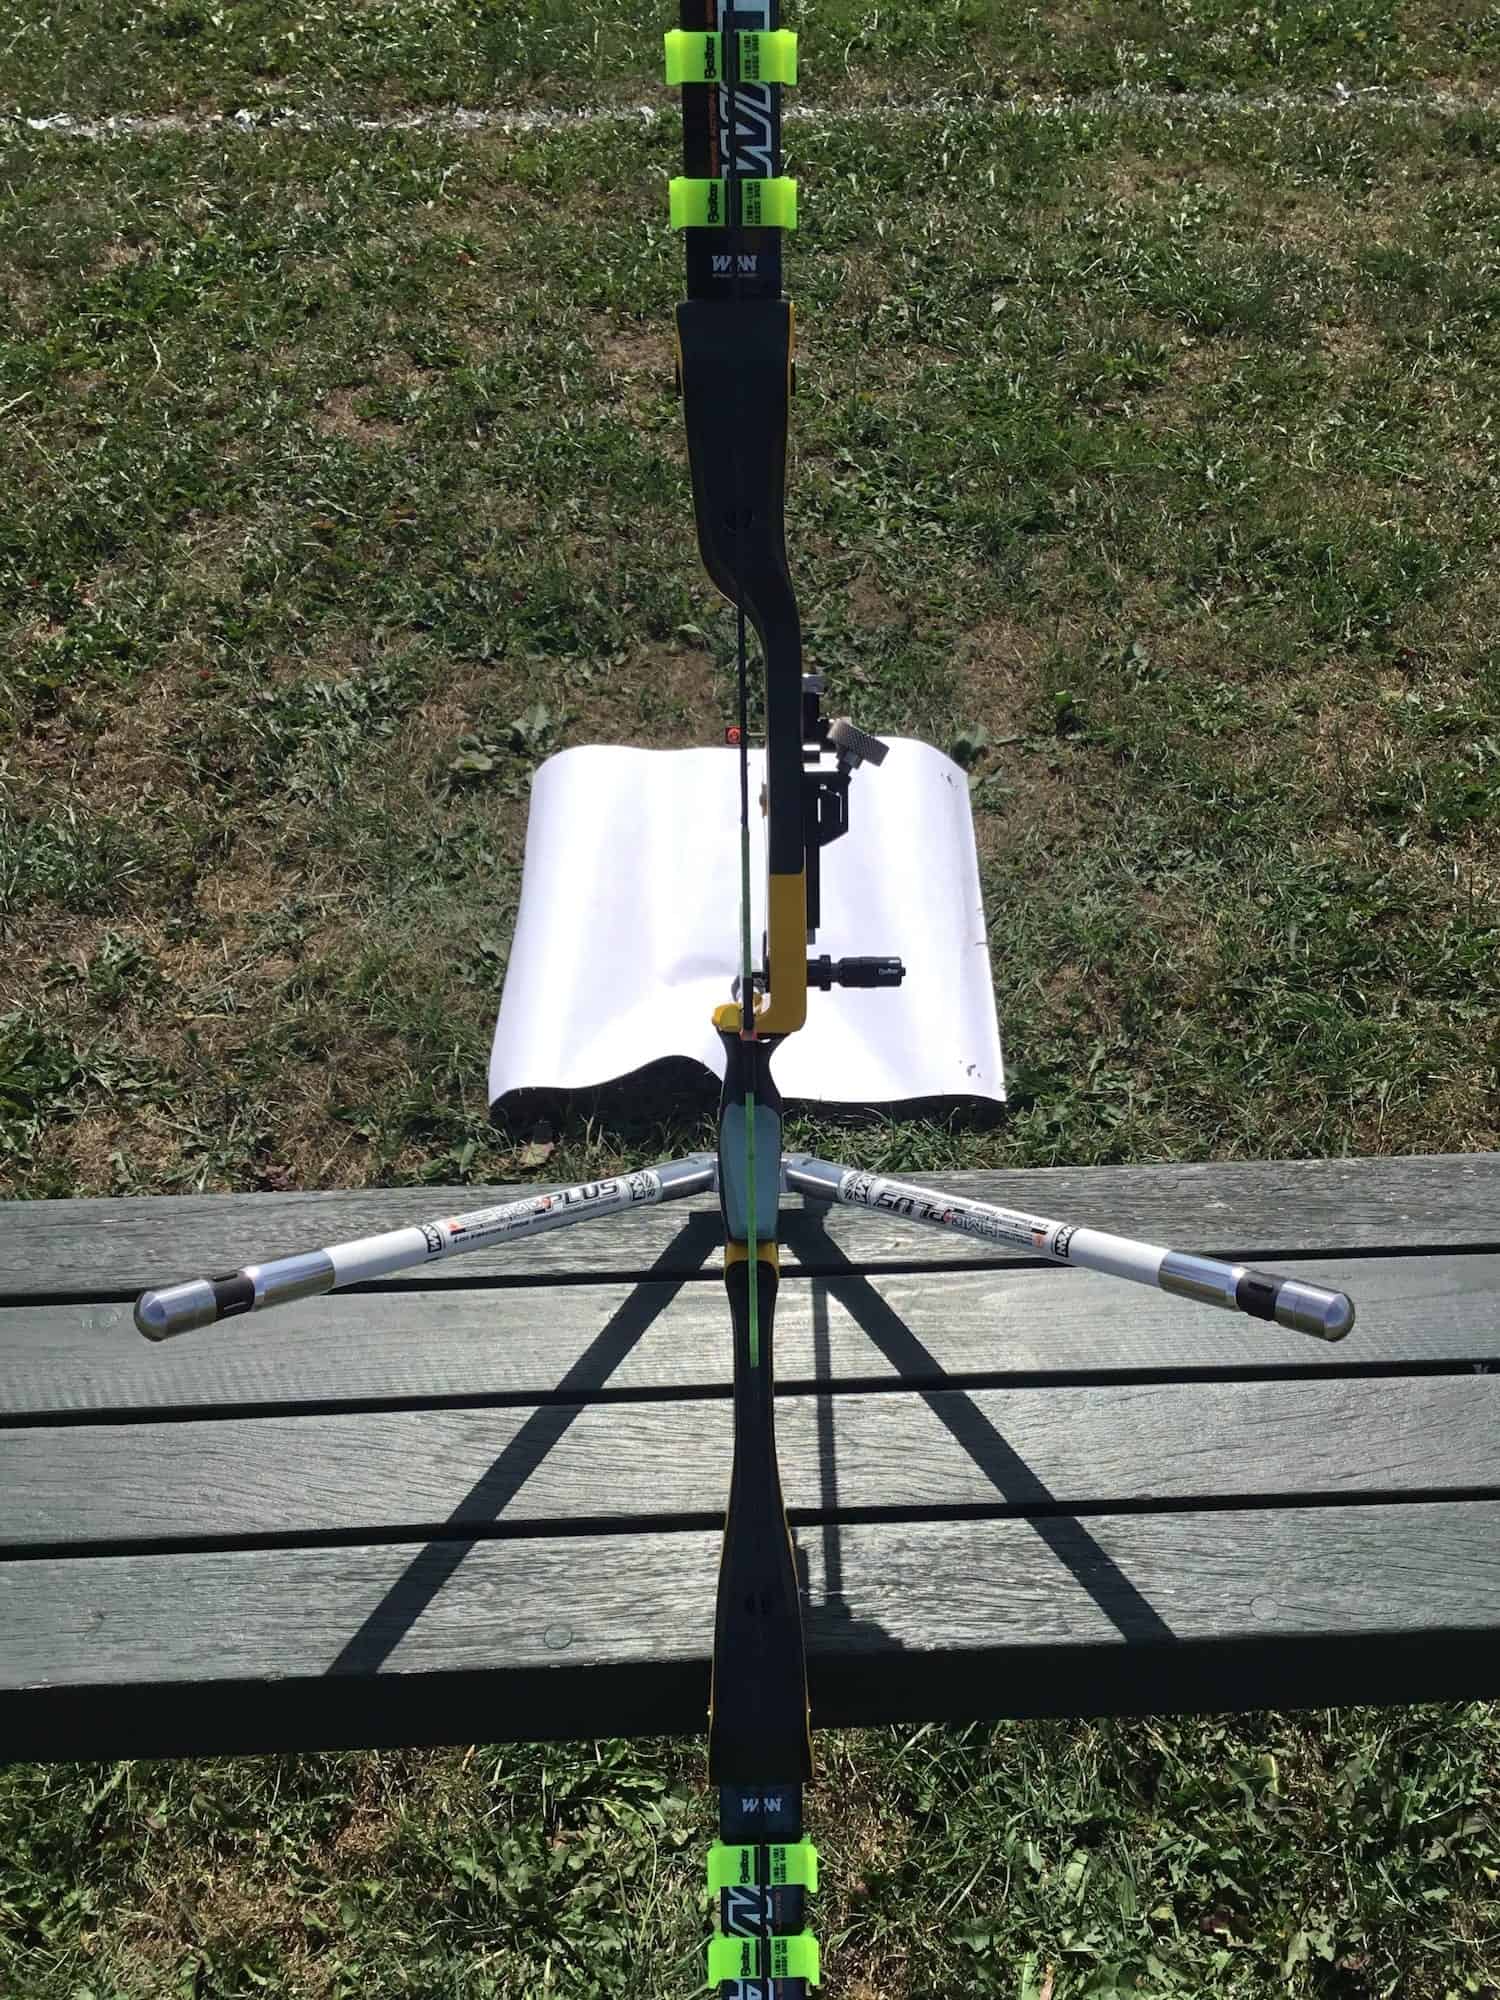
A good starting position we recommend for your centreshot is shown in Fig. 5. Line up the string with the limbs and riser as shown, then adjust your pressure button length until the point of the arrow is just slightly to the left of the string. If you are shooting X10’s stiffer than the 650 spine, you might want the centreshot slightly more offset than this, due to the middle of the arrow being thicker than the tips.

The centreshot is just a starting position and it’s not important to get it absolutely correct. Later on you can adjust it more finely. Most people shoot with the centreshot shown in Fig. 5, which is why we start in that position. You may later find that you shoot better with a different centreshot.

It’s useful to place a sheet of paper on the ground in front of the bow as you can see in Fig. 5. This will help you clearly see where the arrow is and set the centreshot more accurately.

W&W TFT riser showing centreshot adjustment for recurve tuning
Fig 5. A good starting position for your centreshot

ARROW REST SETUP

As you adjust the centreshot, it’s also good to make sure your arrow rest is in the correct position and re-adjust it. This is because changing the centreshot can move the arrow position slightly.

You want to get the arrow rest in a position which places the shaft of the arrow in line with the pressure button (plunger). Furthermore, the rest should be in a position so that it holds the arrow securely with the minimum amount of arrow rest sticking out from the bow.

A good arrow rest position looks like that shown in Fig 6. a,b,c. From below, the rest arm should extend under and hold the whole arrow. However, you shouldn’t see any of the rest arm extend past the shaft of the arrow when viewed from above.

A good arrow rest position with the button lined up centrally
Fig 6a. Good vertical arrow position against button.
Good arrow rest position for a recurve bow
Fig 6b. Good rest arm position. Not visible from above arrow.
Win and Win AXT showing good arrow rest position for a recurve bow
Fig 6c. Good rest position as viewed from underneath

SIGHT SETUP AND ALIGNMENT

The final stage of your bow alignment is making sure your sight is level. This is very simple but is essential to make sure you don’t have to move your sight windage when you change distance.

Firstly, place an arrow in the bow. Then line your string up with the arrow and put your sight block at the top of the sight bar. Check where the string lines up on your sight. Finally, move the sight block to the bottom of the bar and check where the string lines up again. If the bar is straight, the string should be on the same place on your sight block, regardless of the vertical position of the sight block.

In Fig 7. a/b you can see this process demonstrated and can see the sight is level.

Finally, align your sight aperture windage so that it is directly in line with the string (Fig. 7c). This provides a good starting point for your tuning. Video 1 below from our Online Archery Academy YouTube channel also covers this.

Now that you’ve fully setup your recurve bow, it’s time to learn how to tune it properly in parts 3 and 4 which are the most in-depth parts of this tuning guide!

Sight alignment for a recurve bow
Fig 7a. Sight alignment 1
Sight alignment for a recurve bow
Fig 7b. Sight alignment 2
Recurve bow showing limb alignment process for basic tuning
Fig 7c. Sight alignment 3
Video 1. How to setup your recurve sight

How To Tune A Recurve Bow - Tuning Guide Part 3

BASIC RECURVE TUNING

TUNING A RECURVE BOW BY SOUND

As the name suggests, this step is about shooting the bow and adjusting it to get the quietest sound upon release.

Firstly, shoot at 18m or further without a target face and listen to the sound your bow makes. Although you could do this at close distance, it is hard to separate the noise of your bow from the noise of the arrow hitting the target. Next, adjust your brace height by adding or taking away twists from your string and shoot again. Repeat this until you find the brace height which is quietest for your bow. You might need to get a longer or shorter string at this stage because ideally you want between 15-30 twists in your string.

Once you’ve found the quietest brace height, you should try and find the quietest tiller setting for your bow. Simply vary your tiller somewhere between +0-6mm and listen to which setting sounds the quietest. Most people should have a tiller between this range.

These settings of brace height and tiller are individual to yourself and to the exact bow set-up you are shooting. The optimum brace height and tiller can vary between different pairs of limbs and different risers, even when they are the same model.

INTRODUCTION TO RECURVE TUNING TESTS

The first step here is choosing arrows which are the correct spine and length for your chosen poundage. The best way to do this is to use the Easton Arrow Selection Chart. This is only a guide and is a good starting point, but you should always test arrows before buying them. Because there are so many factors which affect the recurve release and the tuning of an arrow, not everyone “fits” the selection chart recommended arrow spine.

Once you have found what arrow spine and length the chart recommends, try and find someone at your club that has a similar arrow and try it out if you can. You can also try different arrows at most good archery shops. From this point onwards we are going to assume you have selected the right arrow spine for you. Now, the only thing you need to do is to set up your bow so that it is set to a good basic tune.

Knowing how to tune a recurve bow is about using multiple tests and double checking your results. So you should use as many of the tests below as you can to build up a picture of how your arrows are tuning. These tests will help you with your basic recurve tuning. Furthermore, you can use these tests when you are trying arrows to find out if they are the correct spine for you. If you can’t get these tests to show good results, then you should try one spine stiffer or weaker.

KEY POINTS FOR TUNING A RECURVE BOW

1. Set and leave your button to medium tension (around 6.0 on the default spring for a Beiter button).

2. Always adjust your nocking point height first.

3. Changing point weight doesn’t tune a mis-matched arrow.

4. Basic tuning should be done by changing three things only: arrow length, spine, and poundage.

5. As a very rough guide, cutting an arrow 1inch (from the front) has the same effect as shooting 1 arrow spine stiffer, which equates to shooting -5lbs draw weight.

6. Changing the nock can change tuning a lot. For example, a recurve arrow with a Beiter Over Nock can tune over 3lbs weaker than the same arrow with an Easton Pin nock.

7. Any point of contact with the bow can have a huge impact on tuning. Changing your tab, bow hand position, hook or where the string touches can change your tuning completely.

8. You can only tune your bow to the level you can shoot. Tune at a distance you can keep arrows in the gold.

9. You can get a ‘false tune’. For example, you could be shooting an arrow which is so weak that it hits the bow and appears to tune stiff.

10. Ideally, we would like to shoot with the clicker about 4.5cm±1cm from the pressure button centre.

11. Bareshaft arrow flight and impact are much less meaningful past 30m. Checking your tuning using a bareshaft at 70m is only a secondary check for very advanced archers. Never use 70m as a tuning check on it’s own, 30m and 18m are much more meaningful.

HOW TO TUNE A RECURVE BOW – BARESHAFT IMPACT LOCATION

All the tuning instructions below for bareshaft reaction, arrow flight tests and impact angles are for right handed archers. Reverse them if you are left handed.

For a right handed archer: a weak bareshaft goes RIGHT. During initial flight and impact the nock is LEFT compared to the point.

For a left handed archer: a weak bareshaft goes LEFT. During initial flight and impact the nock is RIGHT compared to the point.

HOW TO USE ARROW CLEARANCE TESTS TO TUNE YOUR RECURVE BOW

When you release the arrow, it should bend around the riser and pass without any part of the arrow contacting any part of the bow. This is called ‘clearance’. If the arrow contacts the bow this is an issue and it can cause very erratic grouping and strange tuning results. You can see good clearance in Video 1 below.

You can put talc powder on the rear of your arrow and shoot it as normal. Any contact points with the bow should be visible as streaks in the powder.

Signs of bad arrow clearance

1. Ripped or torn fletches on either of the fletches facing the riser. A classic example is shown in Fig. 8.

2. Worse grouping than you would expect at short distance (30m and less) compared to your grouping at long distance (50m and more).

3. Wildly erratic arrow flight when the arrow first leaves the bow.

4. An arrow that flies and lands with the tail strongly to one side

5. Strong gouges, marks or dents on the pressure button tip.

6. Too few inner arrows in your group. I.e. if you shoot 90% of your arrows in the gold but shoot very few 10’s.

7. Contradicting tuning results. I.e. a bareshaft test signals a weak arrow at 18m but a stiff arrow at 30m.

8. Marks on the rear of the arrow shaft near the fletches from contact with the bow.

how to tune a recurve bow and fix clearance issue
Fig 8. Bad clearance showing torn fletch

HOW TO TUNE TO IMPROVE ARROW CLEARANCE

1. Ensure your bow alignment is correct.

2. Check the arrow spine, length and poundage of your bow are matched.

3. Make sure you’re not torqueing the bow grip with your bow hand.

4. Check the string fingers are not touching or pressing the arrow.

5. Look at the release stage of your shot and make sure direction and movement are maintained correctly with no collapse.

6. Observe the path of the string on release. Make sure it doesn’t hit or drag against anything on release.

7. Make sure your nock fit is good.

Video 2. Good arrow clearance

ARROW IMPACT ANGLE AND USING IT FOR RECURVE TUNING

For this test, stand as close as you can to the target, with the longrod a few centimeters from touching the target. Aim at a height where your longrod is as close to horizontal as possible.

Shoot a few arrows,  and observe the angle they impact in the target. This can be done with fletched arrows but is most useful when done with bareshafts.

Next, take a step back and shoot again. Continue doing this until you get to around 10m. If the nock of the arrow is consistently higher than the point in the target, this can be an indicator that your nocking point is too high. Likewise, if the reverse is true, your nocking point may be too low. When the arrow impacts with the nock to the left, the arrow is reacting weak.

It is normal to get a slight angle of the arrow in the target as it oscillates in flight. You would see this reflected in the angle of your bareshaft changing slightly left and slightly right as you walk back. If the angle is fairly large and is consistently in one direction, this is an indicator of your arrow spine.

BONUS TIPS ON READING ARROW IMPACT ANGLE

Bear in mind that arrows can sometimes impact at strange angles due to the target material having inconsistencies. Normally this test is best done using a foam target.

As the bareshaft flies in the air, the initial reaction tells us about the tuning. After this, the arrow naturally enters a secondary reaction. This means that the flight and impact angle of the arrow can actually reverse once you go to 30m or beyond. This is why we use 30m and closer for bareshaft tuning.

As an example, you can see in Fig. 9b the stiff bareshaft is angled with the nock left at 30m. However, when this set-up was shot at close range, the arrow impacted with the nock to the right. This tells us the arrow is stiff. It reacts stiff judging by the close range impact angle and is stiff judging by the position of the bareshaft at 30m.

If your tuning setup is very bad, you may get the impact nock angle the opposite way to how the arrow is actually reacting. That’s why it’s good to always double check this test with the arrow flight and bareshaft tests. Centreshot can also affect bareshaft impact angle, read more about this below.

BARESHAFT RECURVE TUNING INTRODUCTION

Fore recurve, this is the main test you should use to do the basic tuning for your bow. Remember, shoot at a distance (up to 30m) where you can keep most arrows in the gold. Make sure you have at least 3 fletched and 3 bareshaft arrows for this test. For the bareshaft arrows, either tape down your vanes or de-fletch your arrows and add an equivalent weight of fletching tape to the rear of the arrow.

Shoot your fletched and bareshaft arrows as you would normally shoot. You are looking to see the relative impact points of the fletched/un-fletched arrows.

HOW TO TUNE A RECURVE BOW WITH BARESHAFT TUNING

1. Don’t tune when it is windy. Still conditions are essential for tuning.

2. Shoot consistently. Many people become tense when they shoot their bareshafts, make sure to shoot them like any other shot.

3. Repeat your results. Do the test at least a few times and make sure your results are consistent. Ideally repeat the test on different days too.

4. Change the order you shoot the bare/fletched arrows each time you do the test.

5. Use new nocks on both the bareshafts and the fletched shafts, and make sure your fletching is consistent.

6. Shoot your normal gear. Tune with the equipment you’re going to use in competition. This is especially true for finger tabs! Tune with your finger tab worn in to the same amount you will shoot it in competition.

how to tune a recurve bow with bareshaft plunger tuning
Fig 9a. Nock point too high and stiff arrow.
tuning a recurve bow with bareshaft plunger tuning
Fig 9b. Nock point now good, stiff arrow.
how to tune a recurve bow with basic bareshaft tuning
Fig 9c. Nock point too low, weak arrow.

WHAT DOES THE BARESHAFT MEAN?

You always need to correct the height of the bareshafts first. So in Fig. 9a and 9c, this needs correcting before trying to tune the arrows.

To correct the LOW BARESHAFT position in Fig. 9a you need to move the nocking point DOWN. To correct the HIGH BARESHAFT position in Fig 9b you need to move the nocking point UP.

You should use a temporary nocking point at this stage so you can quickly make adjustments. Once you know what position you need, you can make a proper nocking point.

Finally, you tune the arrow using the spine, bow poundage and arrow length. A stiff arrow can be weakened by shooting a longer arrow or shooting a higher poundage. A weak arrow can be stiffened by lowering the poundage or cutting the arrow shorter. If you can’t tune the bareshafts to within your group by using either poundage or arrow length, you may need to get a different spine arrow.

TUNING A RECURVE BOW BY OBSERVING ARROW FLIGHT

You’ve now learnt how to setup and tune your recurve bow, but tuning is ultimately about clean arrow flight giving you tight grouping. So this is another check you can use to check your tuning.

The purpose here is to shoot and observe the flight of the arrow as it leaves the bow towards the target. For this test, it’s very helpful to get someone else to watch your arrow flight, especially if they can observe with binoculars. It can be tricky but videoing the arrow flight can also be very helpful.

Do this test between 18-30m, it’s normally helpful to put the target face up with the blank side facing you as you can see in Fig. 10. This makes it a lot easier to see the arrow flight. It doesn’t matter where you aim and where the arrows go as you are interested in the arrow flight.

HOW TO READ YOUR TUNING FROM ARROW FLIGHT

If the arrow flies with the nock high, you should move the nocking point down. The nock to the left means the arrow is reacting weak, and to the right means it is reacting stiff. You can observe this with bareshaft or fletched arrows, but bareshafts normally exaggerate the movement. When you are observing the flight, look for the first reaction of the arrow as it leaves the bow, not the corrective secondary reaction.

Sometimes the arrow can be so badly tuned that the nock actually appears to react in the opposite way to what it should do, that’s why you should combine this test with our other checks.

HOW TO TUNE A RECURVE BOW – NOTES ON TUNING WITH BARESHAFTS

Remember, the initial bareshaft reaction is what we want to observe to tell us about the tuning.

BARESHAFT IMPACT ANGLE: Use close range up to 10m to read the bareshaft impact angle of the arrow to tell you about arrow spine. Between 10m-30m if the position of the bareshaft matches the position of the fletched arrows, the impact angle should only be used as a check of centreshot, not of the arrow tuning.

BARESHAFT POSITION: Between 10m-30m use the bareshaft position relative to fletched position to tell you about arrow spine.

BARESHAFT FLIGHT ANGLE: Between 10m-30m use the FIRST reaction of the arrow flight after the arrow leaves the bow to tell you about the arrow spine.

tuning a recurve bow arrow flight with plunger button
Fig 10. The blank side of the target face makes watching arrow flight much easier because of the white background.

How To Tune A Recurve Bow - Tuning Guide Part 4

ADVANCED RECURVE TUNING

These tuning tests are for more skilled and experienced recurve archers. The previous section makes sure your arrow length, spine and poundage are matched correctly. Advanced tuning is then about making small adjustments to your equipment to increase the forgiveness of your recurve set-up. This will make your arrows group tighter.

HOW TO FINE TUNE YOUR BOW WITH RECURVE WALKBACK TUNING

The walkback test is a great tool to check the overall set up of your button tension and centreshot. However, you must make sure the bow is level when doing this test. If you cant the bow, it will give false results.

WALKBACK TUNING STEPS FOR RECURVE

  1. Start by putting your sight at the top of the sight bar and placing an aiming mark at the very top of the target.
  2. Importantly, don’t move your sight for the entire test.
  3. Stand about 5m away, aim at the mark you placed and shoot enough arrows to form a reliable group. Mark the group with a target pin before pulling the arrows.
  4. Step back 5m and shoot another group whilst aiming at the mark. Mark the group again.
  5. Step back another 5m and repeat. As you do this your arrows will land lower and lower on the target. Keep doing this until just before your arrows fall off the bottom of the target.
  6. At the end of the test you will have a shape formed by the target pins you placed.
  7. Ideally, the target pins should form a straight line as in Fig. 11a.
  8. However, if the pins form a curve, try adjusting your centreshot as shown in Fig. 11b/c.
  9. If the pins form an angled line, try adjusting your button tension as shown in Fig. 11d/e.

The adjustments above normally work, but sometimes a curved line needs button tension adjustment instead and a straight line needs centreshot adjustments. Learning how to tune a recurve bow is about using different tests and finding what your results mean to you. So try this if the normal adjustment doesn’t work.

how to tune a recurve bow with walkback tuning
Fig 11. How to read your recurve walkback tuning results

RECURVE PLUNGER TUNING FOR GROUPS

The ultimate aim of recurve tuning is to score higher by making your group size smaller. Plunger tuning is the most time consuming exercise, but can make your set-up more forgiving to your individual recurve style. In fact, although it is a long process, you do it while you’re shooting and scoring during your normal training sessions. So in reality, you don’t actually lose any training time.

You can include as much data as you want for your plunger tuning. Clearly, the more data you have for each individual setting, the more reliable results you will get. Plunger tuning is only really worth doing for advanced recurve archers. If you can shoot around 650 on a Fita 720 round regularly, plunger tuning is worth your time. Otherwise, basic tuning will be more than sufficient and it would be better to focus on improving your recurve technique further.

To start plunger tuning, note down all the details about your current recurve set-up. Then, choose one equipment setting that you want to vary.

For a recurve, the most useful settings to vary for your plunger tuning are normally:

1. Nocking point height

2. Plunger button tension

3. Plunger button centreshot

4. Brace height

NOTES ON RECURVE PLUNGER TUNING

All you need to do is shoot LOTS of arrows and plot them with a certain equipment setting. Ideally this should be spread out over lots of different days, possibly even weeks if you want to get very accurate results. Then, you just change something on your equipment, such as button tension and repeat. 

Importantly, you should try to collect the same amount of data for each setting for a fair comparison. You can use our plotting sheets on the Score Sheets & Resources page, these are ideal for group tuning and arrow selection as this is what we made them for!

Once you have found the optimum set up for your bow from group tuning, return to the bareshaft tuning test and note down where your bareshafts land now. This is the optimum setting for you. When you set up a bow in the future, you can tune the bareshaft to this position initially.

TUNING A RECURVE BOW WITH SLOW MOTION VIDEO

Recurve tuning has become much more objective over the last 10 years. This is largely because of the widespread availability of information and slow motion cameras. Most smartphones can record high speed video which is good enough to detect contact issues which could cause clearance problems.

More advanced cameras with higher frame rates can help see the arrow clear the bow such as in Video 2. For detecting form issues, even just 50fps can be very beneficial. However, 100-500fps is normally the optimum for high speed form work. This is great because most phones can do approximately 240fps.

In order to see arrow clearance and your arrow tuning clearly, you normally need a minimum of 1000fps.

Become an OAA Member + Join My Community

Get unlimited access to all OAA website content. 

Plus join my community for Q&A’s, exclusive videos, training programs and much more!