🎉 Transform Your Archery in 2025 with a Limited-Time 20% Discount On All My Guided Courses. Click Here to Learn More.

Set (Hook & Grip) - Archery Hand Position

Table of Contents

ARCHERY HAND POSITION - INTRODUCTION

In archery, your hand position has a big impact on your overall consistency. This is because your hook and grip are the only two permanent contact points with the bow through the whole shot. As a result, your hand position is very important for consistent archery technique. Everyone’s hands are different, and the exact way you position your hook and grip will be personal to you.
 
However, bow hand grip positioning is very consistent among the worlds top archers. Even though most archers use a custom grip which fits their hand, the position of the bow hand is very similar between top archers. However, there is a lot more variation with the position of the draw hand, or ‘hook’. This is because grip position is subject to just two variables: the bow hand shape and the grip shape on the bow. The hook is subject to three variables: hand shape, tab shape and face shape. This is because your hook must allow you to achieve a good full draw position.
 
You can learn about the basics of recurve archery in our Recurve Archery Basics guide. Or you can find drills to improve your set position in our Drills & Bow Training library. You can also see more videos about proper hand position on our Online Archery Academy YouTube Channel.
 

Become an OAA Member + Join My Community

Get unlimited access to all OAA website content. 

Plus join my community for Q&A’s, exclusive videos, training programs and much more!

ARCHERY HAND POSITION - KEY TIPS

GENERAL

1. Bow on foot. Hook first then ‘v’ of hand in throat of grip. Raise to intermediate set position.

2. Maintain core and posture. Keep shoulders neutral.

3. Bow angled slightly left. Hands positioned to enable bow angle and neutral wrist before opening the bow.

HOOK – DRAW HAND POSITION

1. Hook in first joint of index and middle finger. Slightly in front of joint on ring finger.

2. Pressure roughly 30% top finger, 50% middle finger, 20% bottom finger.

3. Direction of string pressure slightly to pad of fingers, not straight into joint.

4. Draw hand thumb and pinky finger position is personal. Find position to give good wrist and anchor position.

5. Draw wrist neutral.

GRIP – BOW HAND POSITION

1. Place hand in grip by pivot point first, then pressure point.

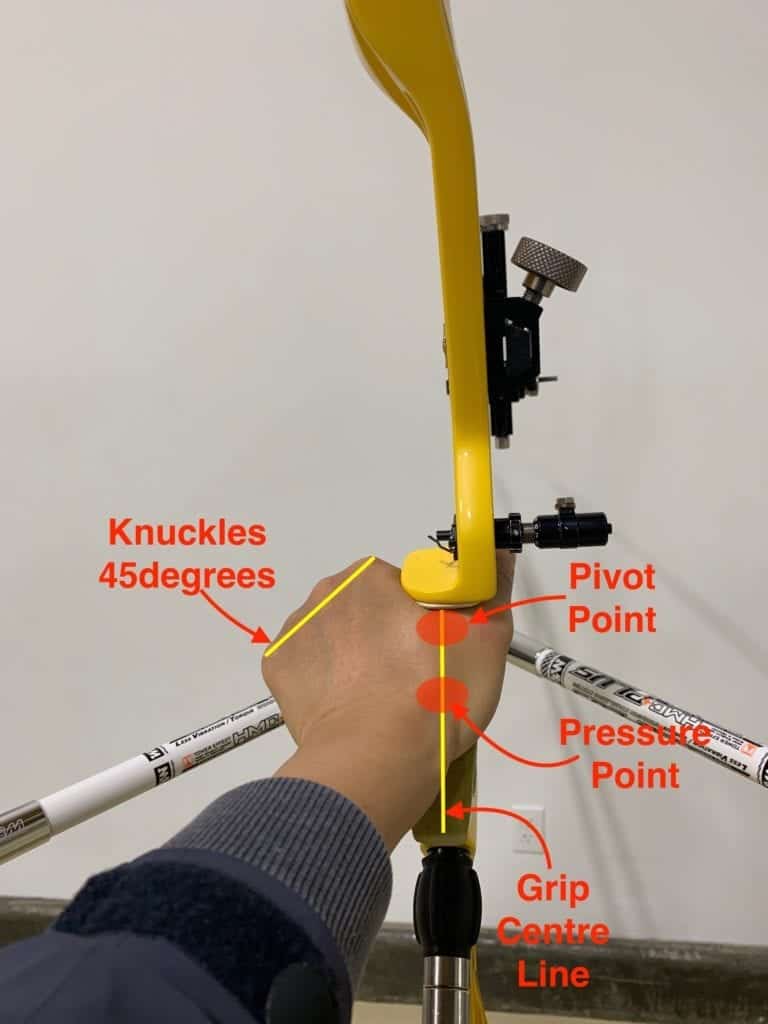
2. Grip should contact only on thumb pad side of lifeline. Knuckles 45 degrees, pulled slightly back.

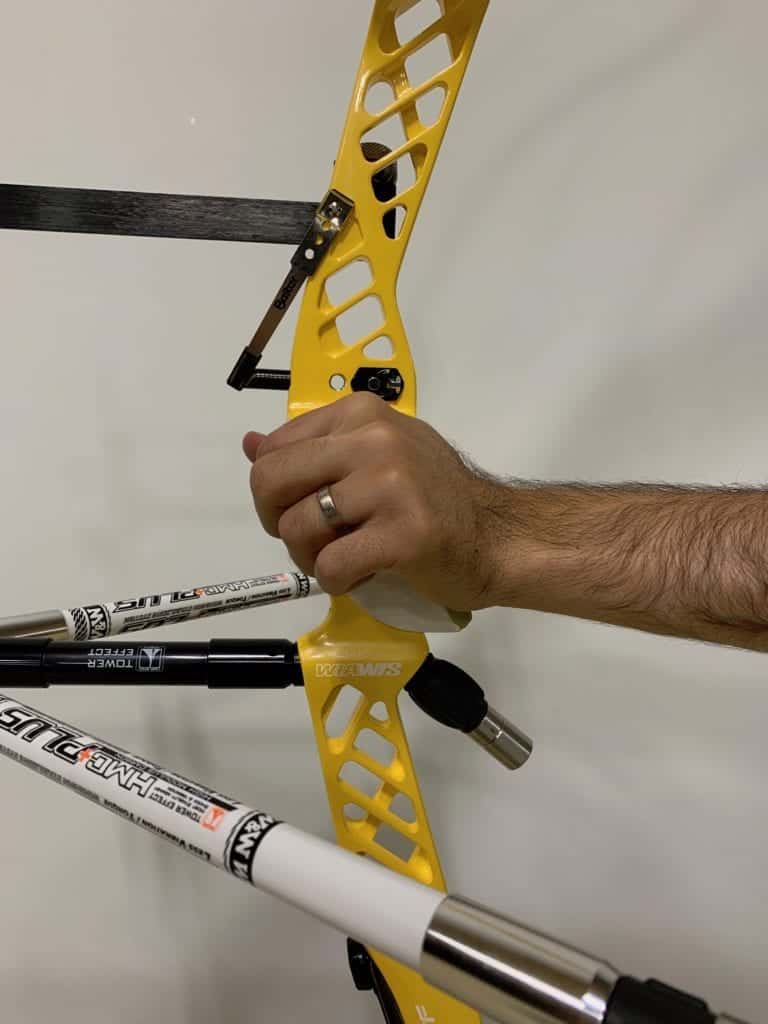
3. Direct bow forwards to the target with the thumb. Use a finger sling between thumb and index finger.

4. Experiment with different grip shapes to find one suitable for your hand.

HOW TO POSITION YOUR BOW

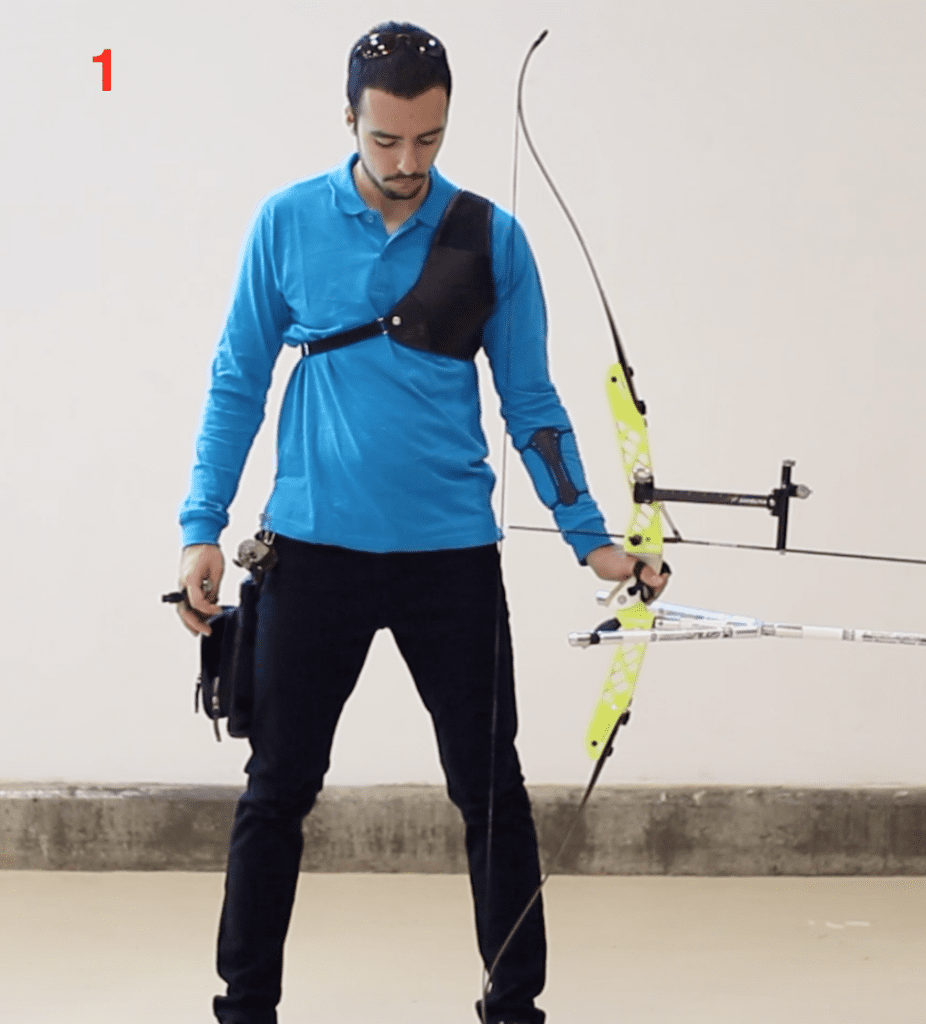
There are many different ways you can place your bow for the set position. Like all technique, there is not one position which is best for everyone. However, we recommend starting by placing the bow on your foot. Then, when you set your hook and grip you’ll need to lift your bow to an intermediate position. This overall method pairs well with the square stance that we also recommend to start with.

Again, you can experiment once you become experienced with the basics of the set position.

LIFTING THE BOW

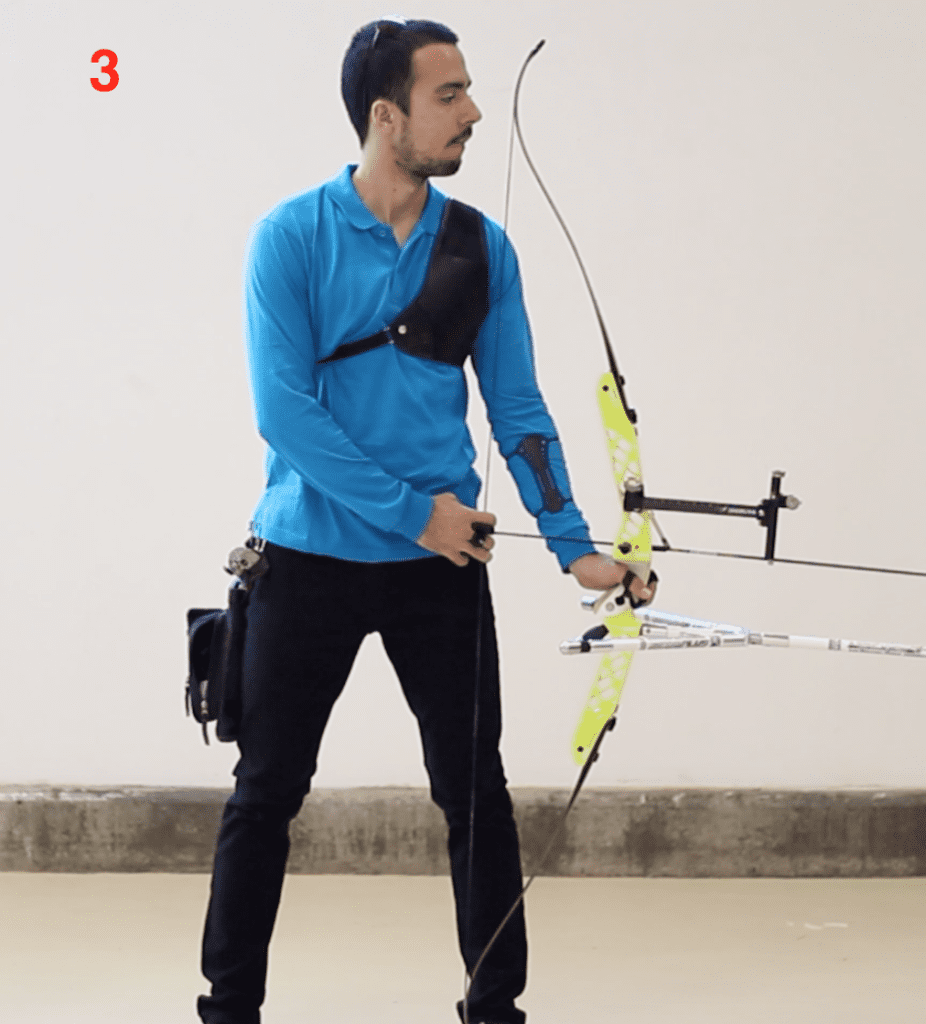
You can see the starting hand position at set in Fig 1a. At this point, you have set your stance & posture and have the bow resting on your foot ready to start the shot.

Firstly, you place your draw hand fingers on the string to form your hook (Fig 1b). Then, you stretch out the web of your bow hand and place it into the throat of the grip (Fig 1c). At this point you should only feel the bow in the web of your hand as shown in Fig 3a by the pivot point circle. Then, you slightly tension the string with the draw arm and lift the bow by directing the web of the bow hand into the bow. This is the set position as you can see in Fig 1d. Most of your pressure should still be directed through the pivot point until coming to the set-up position.

You can also see this full motion in Video 1 below.

archer showing hand position at set 1
Fig 1a. Step 1
archer showing hand position and draw hand hook
Fig 1b. Step 2
archer showing hand position and bow hand in grip
Fig 1c. Step 3
archery hand position when lifting bow
Fig 1d. Step 4

Important Notes

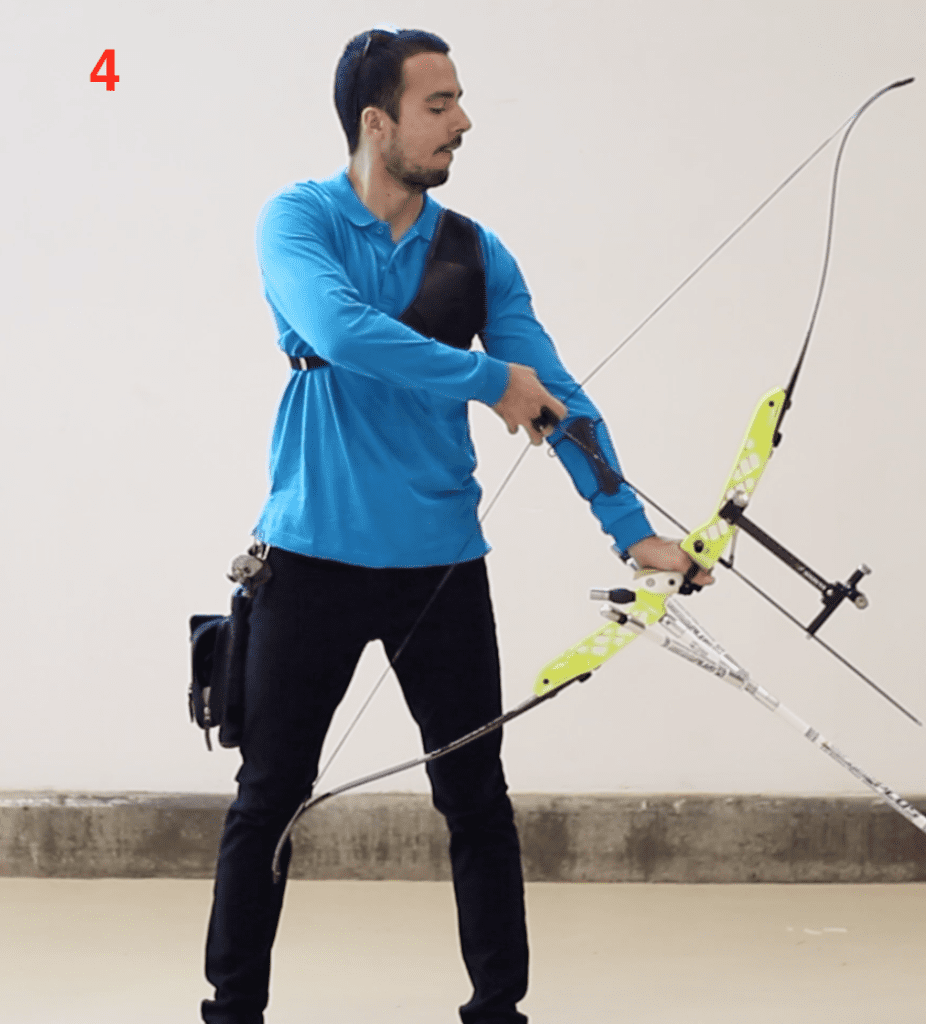
In Fig 2a/b, you can see the position of the bow hand more closely when the bow is on the foot. Touching the back of the bow with your fingers can help to lift the bow to the set position. You can also notice that when the bow is still on the foot, the bow arm elbow is not straight yet.

Efficiency is key in archery, so you should position your hands and bow to make your shot as easy as possible. Don’t place the bow too far away from your body so you have to reach to the grip. If you bring the bow too close to the body it can make it awkward, too. You should aim to have the upper arm of the draw arm close to the side of the body. Furthermore, maintain your draw shoulder in a natural, neutral position.

When the bow is too close to your body, there will likely be a gap between your upper draw arm and the side of your body. When the bow is too far away, you will have to reach too far with the draw hand. And your draw shoulder will raise up and forwards which is not good.

archery bow hand position in grip from side
Fig 2a. Bow hand position at set from side.
archery bow hand position from front and draw hand hook position
Fig 2b. Bow hand position at set from front

Video 1. Recurve hand position, lifting the bow from the foot and setting the hook and grip

ARCHERY HAND POSITION - THE BOW HAND GRIP

PRESSURE & PIVOT POINT

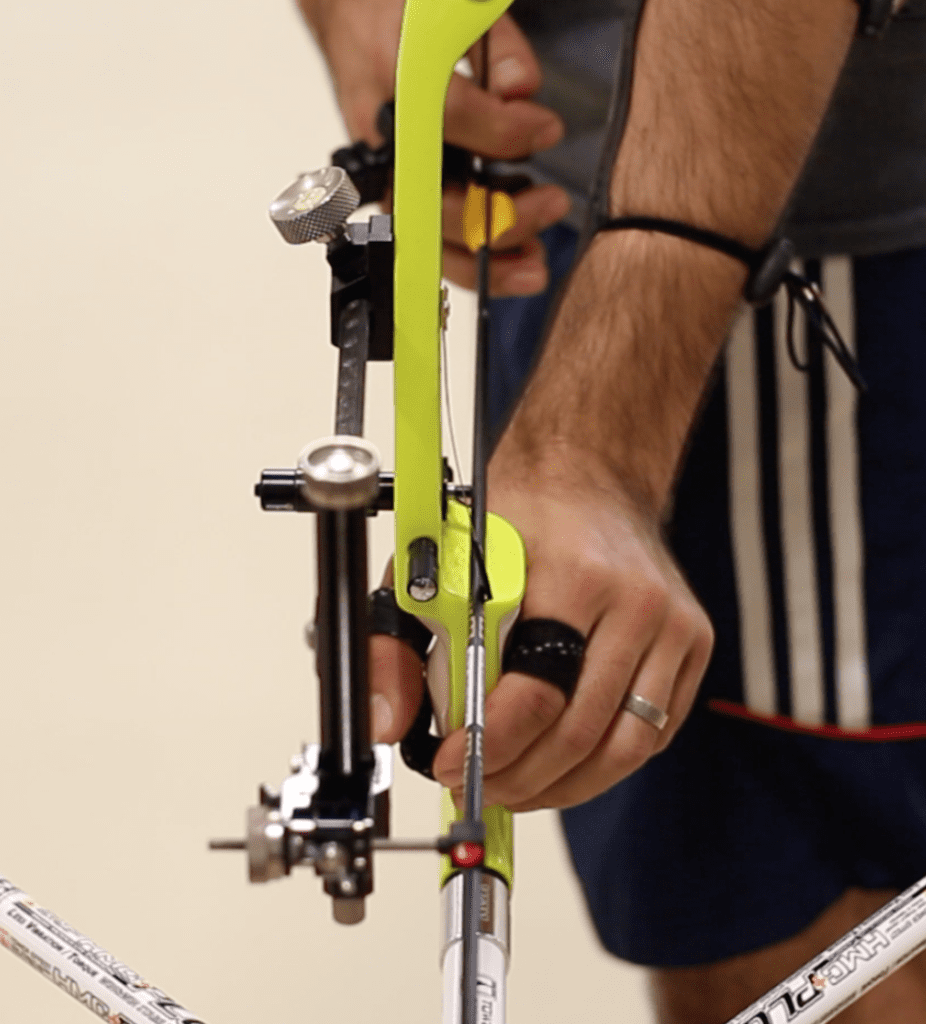
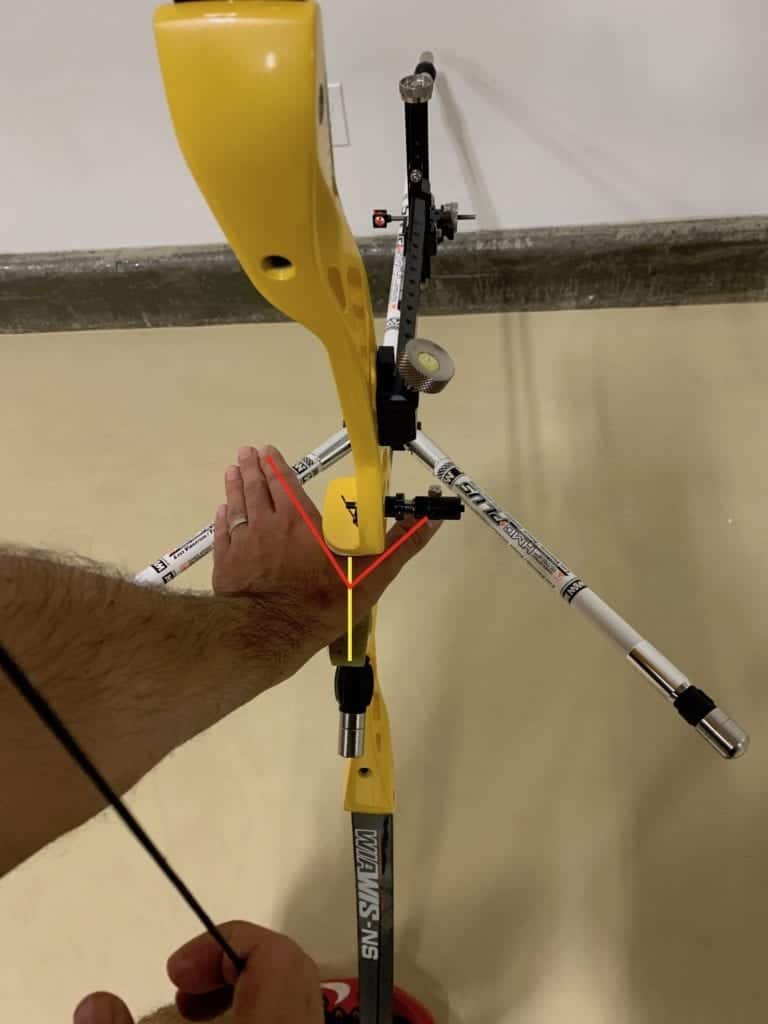
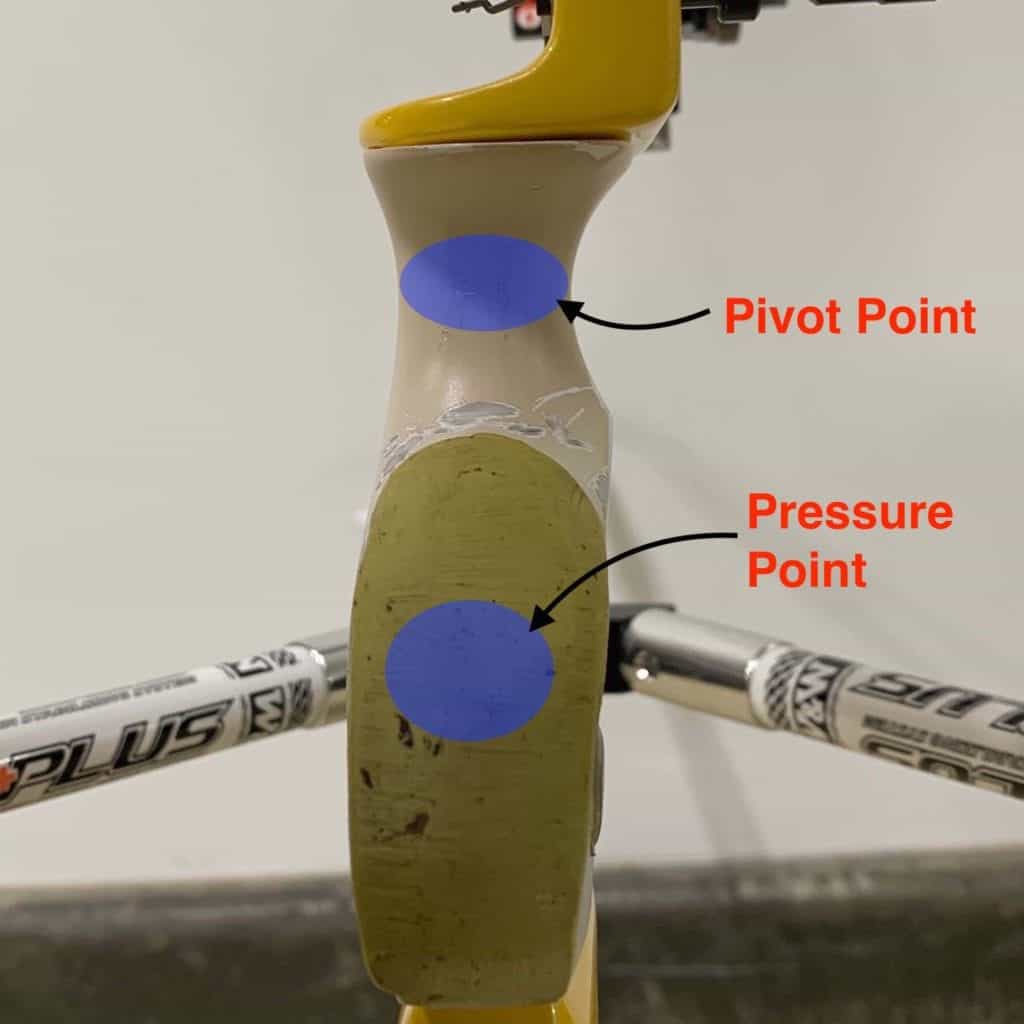
In archery, the throat of the grip is where you position your bow hand during the shot and this is called the pivot point. When you shoot, you must balance the pressure through the pivot point with a pressure through the bottom of your bow hand (using the thumb pad). This allows you to direct the bow towards the target without tilting it. 

As a result of this, there will be a singular point on your grip where it feels as if you are pushing the bow from. And we call this the pressure point. You can see these pressure and pivot points in Fig 3b.

On your bow hand, your pressure point should be on the thumb pad side of the palm of your hand. It is directly below your pivot point in your hand. You can see the bow hand pivot and pressure points in Fig 3a along with the areas where the bow grip should and should not contact. 

Video 2. The recurve grip position. Examples from different angles.

PRESSURE DISTRIBUTION

As you raise and then lower the bow to the set-up position, you should shift the distribution of pressure in your bow hand. Initially the forward pressure is solely against the pivot point when the bow is on your foot. This means the pressure point is effectively in the pivot point. During the raising and lowering of the bow, you should increase the pressure through the thumb pad which will move your pressure point down. By the set-up phase, you want your pressure point in it’s final position. This makes sure that you have a solid connection with the bow through your hand and into your shoulder during the rest of the shot.

Lastly, you should align the pivot and pressure points with the centre of your grip. This helps prevent any torquing of the bow when you release

archery bow hand position showing pressure point
Fig 3a. Bow hand pivot and pressure point position
archery bow grip showing hand position and pressure point
Fig 3b. Bow grip pivot and pressure point position

BOW HAND POSITION

The key to correct bow hand position is to firstly start with the correct left/right position. A good way to get the feel of the centre alignment of your bow hand is to perform the exercise shown in Fig 4a. The centre part of the web of your hand should be in line with the centre line of the recurve grip.

Secondly, it is important to place the hand in the grip at the pivot point first, using the slightly stretched web of the hand to initially position your hand. Later in the shot you can then place your pressure point in contact with the surface of the grip.

At full draw, the bow hand knuckles should be at least at a 45 degree angle. This helps you direct your pressure onto the bow more consistently and prevent your hand slipping around the left side of the grip. You can see this in Fig 4b, and notice also how the knuckles are curled (Fig 4c) and not completely relaxed.

recurve archery bow hand showing grip positioning
Fig 4a. Locating the bow hand into the grip
archery bow hand pressure point position at full draw
Fig 4b. The bow hand position at full draw
archery bow hand position from side
Fig 4c. Bow hand position with knuckles back

THE 'RELAXED' RECURVE GRIP

It is incorrectly commonly taught that the recurve grip must be as relaxed as possible. However, this causes many issues. If you allow the wrist and bow hand to be completely relaxed, your hand will slide off the grip. This compromises you bow arm positioning and your release on the bow arm side. This also can cause string contact issues with the arm.

There must be some tension in the bow hand in the correct places. You must slightly pull the ring and little finger knuckles of the bow hand back (see Fig 4c and 5a) and directly push your thumb straight towards the target. This thumb direction is crucial for consistent forward pressure and you can see the direction in Fig 4b and 5b.

In fact, the knuckle position in Fig 4c could actually be pulled slightly further back to look more like the archer in Fig 5a. Lastly, it’s crucial to have good bow arm elbow rotation. This is because it helps connect your pressure point solidly to your bow shoulder. You can read about this more on the Recurve Technique – Set Up page.

recurve grip position example
Fig 5a. Bow hand position example 1
recurve grip positioning example
Fig 5b. Bow hand position example 2

FINGER SLINGS

A finger sling is essential for competitive recurve archery. We recommend using a simple piece of string or shoelace tied between the thumb and index finger of the bow hand.

Some people place the finger sling on the middle finger, instead of the index finger. However, it is better to place the finger sling on your index finger. It helps your knuckle angle to be at least 45 degrees whereas it is tempting to lessen the knuckle angle if you use a sling on the middle finger. Also, using the sling on the middle finger generally compromises the feeling of forward direction and your bow hand release compared to using the index finger.

ARCHERY HAND POSITION - THE DRAW HAND HOOK

FINGER POSITION

As with many areas of recurve archery, your draw hand position on the string will vary from person to person. As a result, it is possible that you might need to adjust your hook slightly to account for your hand or face shape. Focussed experimentation and good feedback is key.

The start of any hook is where you place your fingers on the string. You should place the string in the groove of the top and middle finger and slightly in front of the groove on the bottom finger. For most people, the top two fingers should be in the groove, with the third finger placement varying slightly to accommodate individual hand sizes.

You can see this finger placement shown in Fig. 6 below. The thumb and pinky finger are positioned out of the way to show the finger placement properly, this is NOT the position they will be in during the shot.

archery draw hand finger position when hooking string
Fig 6. Draw hand finger position on string

In Video 3 below, you can see a common mistake many archers make. The hand is rolled over too far so that it is very hard to place the string in the groove of the top finger. You can see how the string is incorrectly initially deeper than the groove of the first finger.

Firstly, once the finger position is corrected by rotating the hook slightly clockwise, the finger placement is much better. Secondly, the wrist angle is now less kinked. The archer is now able to connect the hook with the arm and back, an essential skill to be competitive in recurve archery.

Lastly, the draw elbow and shoulder is in a much better position when the hook is correctly connected. In the first example, the draw elbow and shoulder is too high as a result of the hooking. When the hook is correct, the archer has a lower draw shoulder at the set position and this also helps with connecting the hook to the rest of the shot.

Video 3. Recurve archer showing draw hand finger position on the string

DRAW HAND & WRIST POSITION

In recurve archery, it’s common for people to kink the draw hand wrist inwards at the set position and maintain this throughout the shot. You can see an example of this in Fig. 7b where it is clear that the wrist is bent. Notice also how the joints of the draw hand fingers, wrist and elbow do not form a straight line. This is not good. 

Compare this to the better hand and wrist position shown in Fig. 7a and the difference is obvious. The wrist is much straighter and the joints of the fingers, wrist and elbow line up. This is a much more efficient position biomechanically and will help reduce the chance of injury. Throughout the shot, the hand and wrist angle should either be in neutral, or the wrist joint should be kinked slightly outside the arm line rather than kinked inwards.

If your wrist and arm is kinked as shown in Fig 7b, it is very difficult to connect your hook through to your elbow and scapula. This means that drawing the bow will be much harder and achieving good alignment and scapula positioning will be extremely hard.

archery hand position from overhead at set
Fig 7a. Good draw hand/wrist position at set
incorrect recurve archery draw hand position showing bent wrist from overhead
Fig 7b. Compromised draw hand/wrist position at set

THUMB AND PINKY POSITION

There are different options for the placement of your thumb and little finger on your draw hand. Different archers place these fingers quite differently, and finding an option which works for your hook and recurve form is key.

Importantly, you should know that the amount you curl or tension your little finger has a direct impact on the amount of tension on your ring finger on the string. Also, how you position your thumb can change the shape and feeling of tension in the whole hand and wrist. You should make sure that your thumb position doesn’t negatively impact your draw hand wrist position.


Placement Options

In Fig. 8a, you can see the thumb is straight and the little finger is curled. This can provide a nice position of the thumb at anchor as the thumb can fit snugly against the neck and jaw. However, this thumb position can encourage you to kink your wrist as shown in Fig. 7b, so extra care is needed to prevent this.

Fig 8b shows the little finger curled and the thumb roughly at a 45deg angle. This position is possibly the most common and offers a nice balance between having the thumb placed well at anchor, but not encouraging the wrist to bend. As the thumb isn’t ‘set’ against any reference, care must be taken with this position to make sure the thumb doesn’t move during the shot.

Fig 8c shows the thumb and pinky touching. This can be a good option to stop both the thumb and pinky moving around, but it may be slightly harder to find a natural anchor position.

recurve archery draw hand finger position 1
Fig 8a. Thumb/pinky position 1
recurve archery draw hand finger position 2
Fig 8b. Thumb/pinky position 2
recurve archery draw hand finger position 3
Fig 8c. Thumb/pinky position 3

FINGER PRESSURE

Recurve archery is easiest when you keep it simple, and the same goes for your draw hand position and pressure. So don’t get too fixated on what exact pressure you need on each finger. For most people, the majority of the pressure should be on the top two fingers with less pressure on the bottom finger. As a very rough approximation, you could think of this as 50% middle finger, 30% top finger and 20% bottom finger.

Often, many archers worry too much about what exact percentage of pressure should be on each finger, but this is not important. It is much more important to have good finger and grip strength and maintain your hook securely through the shot. The key thing is to find a hook which is repeatable and helps the rest of your form.

Finger Pressure Direction

The direction of pressure is important at the set position because it prepares the direction for the opening of the bow. As viewed from overhead, at the set position you should feel as if you are pulling the string slightly to the right (RH archer) so that the pressure of the string is directed slightly to the finger tips, rather than straight through the finger joint. This will help the overall position at set and the rest of your shot.

The common direction of pressure can be seen by the red arrow in Fig. 9, whereas the green arrow shows the better direction. This change also helps the position of the wrist and shoulders.

recurve archer showing hooking direction on the string with finger pressure
Fig 9. Recurve hooking direction

THE OVERALL SET POSITION

POSTURE AND SHOULDERS

As you lift the bow from the foot, it is very easy to lose the connection with the core and allow your posture to weaken. This commonly can cause you to lose engagement in the core and allow the ribcage to lift. As a result, it could compromise your shoulder position and make it harder to feel where your shoulders are positioned.

It is very important whenever you are lifting the bow against gravity to make sure to maintain your core and posture as a result. You can see examples of doing this correctly and incorrectly in Figs 10a and 10b. Although the difference may seem subtle at first, this will have a huge impact on your shot and how it feels.

You can also do exercises in the gym to help this. Take a look at our exercise page, Recurve Archery Exercises.

recurve set position showing good posture and shoulder position
Fig 10a. Good shoulder position and posture
recurve set position showing elevated rib cage and losing core
Fig 10b. Incorrect shoulder position and posture

Key Comparison Points

You can clearly see in Fig 10a the orange line indicating a slight angle the shoulders have. As you can see, the bow shoulder is lower than the draw shoulder. This is important to provide direction in this stage of the shot. You can also see how the core is maintained and the ribcage is not lifted up. Furthermore, it looks like the bow arm is being directed towards the target (red arrow) and the bow shoulder position reflects this. 

By contrast, you can see a compromised position in Fig 10b.  The root cause of this is that the archer has lost core engagement and the ribcage is elevated. They have then lost their shoulder stability and direction. This has finally compromised the posture and shoulder positioning. You can see that the bow shoulder is not being directed towards the target properly. It appears as if it’s being pushed into the body (red arrow). As a result, the orange line is horizontal too, compared to the optimum slight angle in Fig 10a.

The Set Position In Action

In general terms, the archer in Fig 10a has straight posture. But the archer in Fig 10b is almost leaning back. So the whole shot lacks direction towards the target. Figs 10a/b are stills from video clips and you can see these clips side by side in Video 4.

Video 4. Set position comparison

ARCHERY IS EASIER WITH GOOD HAND AND BOW POSITION

The overall position at set is extremely important to help you open and draw the bow efficiently. This is a combination of your body position, hand position and bow position. Also, the position of the bow is often completely ignored but it is of great importance. We will assume here that your posture is good and overall body position has been set.

Bow & Hand Positioning

At the set position it is important to place the bow in a position which allows you to set your hook and grip. And the position should not compromise your draw hand wrist angle which we addressed previously. Furthermore, the position of the bow should encourage you to open the bow properly with proper shoulder positioning.

The most common issue is caused when the bow is in a position similar to that in Fig 11b. The draw hand is closer to the body line (annotated yellow line) than the bow hand. This position encourages a kink of the wrist and makes the bow strongly angled to the right of the target (blue line). This overall position is very weak.

By comparison, you can see in Fig 11a that the draw hand is further from the body line than the bow hand. The bow is angled to the left of the target as a result, which is much better.

It can also help to have the bow slightly canted at set (see Fig 11a) so that the bottom limb is closer to the body than the top limb. However, this is more personal preference.

Overhead angle showing overall recurve set position key points and good position
Fig 11a. Good set position
Overhead angle showing overall recurve set position key points and common mistakes
Fig 11b. Compromised set position

INCORRECT DIRECTION OF MOVEMENT

Recurve technique is about direction and movement. The two illustrated positions in Figs 11a/b give very different directions for opening the bow. And Video 5 shows these two shots side by side.

In Fig 11b, it is clear the archer is thinking about pushing the bow hand straight into the grip (red dot) whilst pulling the draw hand straight towards the body. This direction is shown by the red arrows. As we previously mentioned in Fig 9, the hooking direction is straight into the finger joints, shown by the orange arrow.

This leads to the many issues we have already discussed. In Video 5 you can see that the overall direction of opening the bow is very closed, and overall the shoulders appear compressed and ‘hunched’. Also, the final shoulder alignment is not good.

GOOD DIRECTION OF MOVEMENT

In Fig 11a, the feeling of direction is very different. Here, the archer feels as if he is directing the bow from the right hand side of the grip shown by the red dot and arrow. This balances the opening direction of the draw hook as shown by the other red arrow. Furthermore, you can see the orange arrow indicates the string pressure is directed properly in the fingers now. This set position feels as if you are readying yourself to open the bow away from you, rather than drawing it straight into the body.

Importantly, the red arrows on Fig. 11a do not necessarily trace the path of the body, but show the feeling that the archer has at the set position. The same is true for the dot on the right side of the grip. It does not mean that all pressure is on the side of the grip and there is no contact or pressure on the front of the grip, it means that it feels as if you are balancing the outward force of hooking by directing the bow from the right side of the grip.

Good Direction of Movement in Action

In Video 5, you can clearly see that opening and drawing the bow is easier and much more efficient with good positioning at set. Also, the final shoulder alignment is far better. Finally, the shoulders remain more neutral and relaxed through the whole shot.

Video 5. Overhead comparison of hand and bow positioning at set.

CONNECTING TO THE BACK

With a correct set position, you should now be able to connect your grip and hook with your shoulders and back. The correct direction of movement mentioned above is the first stage in achieving this.

At the set position you should feel a connection between your hook on the string which reaches into the back of the draw elbow (point 2 in Fig 12). This then connects around your body (orange line) onto your lower right shoulder blade (blue ellipse). On the bow hand side, your pressure point should connect through the underneath of your arm (orange line), to your bow arm tricep and finally to the lower part of the left shoulder blade (blue ellipse).

The overall feeling should be that your whole shot is connected in a ‘loop’. You can feel this as a slight engagement of the lower part of the shoulder blades or the area underneath the armpit. Fig 12 shows this connection as viewed from overhead and behind the archer. You can replicate this feeling by drawing the bow with a shot trainer.

Important Notes

Points 1 and 2 and the associated red arrows on both diagrams are the same, just shown from different angles. We should note that the orange line and blue ellipses are not literal. The orange line shows the feeling of connection through your body. The blue ellipses show the feeling of activation on your back, NOT where the shoulder blades are positioned.

recurve set position showing the connection between the hook, grip and shoulders
Fig 12a. Connecting the hands and back
recurve set position showing the connection between the hook, grip and shoulders
Fig 12a. Connecting the hands and back - overhead view